June marked our
last session until September and we started out with a very cool embroidery
stitch, the DrizzleStitch. It is a 3-D stitch and garnered a lot of
laughter while we were stitching. As a 3-D stitch we could see that there were
lots of possibilities for its use on fibre art or other mixed media projects
where stitching could be used.
Our final projects for the season were both FAUX in nature,
the Aleene’s Original Tacky Glue brown paper burning technique that
emulates metal and the making of faux leather, also with brown paper. The
latter conjured up many possibilities especially for those of us who stitch, as
the final result was a very robust paper that felt and looked like leather.
More on both techniques….
Aleene’s Original Tacky Glue – Google
Burnt Brown Paper for the
entire story of when and how this technique came to light. The gist of the
technique is to cover brown paper with a generous slather of the tacky glue and
then hold it over an open flame. As the glue dries it bubbles and the soot
created by the candle flame blackens the entire surface. Make sure to move the
paper around so that you do not burn through your paper, though that and burnt
edges make for some interesting effects. Buff off the soot and you have this
amazing metal look. For more texture, you can move partially dry glue around to
create ridges.
 |
| Burnt brown paper with a variety of finishes. |
 |
| Aleene's Original Tacky Glue directly onto MDF. Glue was burned and heavier glue manipulated for texture. A variety of metallic finished were applied. |
A couple of cautions going forward with this technique – work
in a well ventilated area, preferably outside and NOT on a windy day. It might
also be prudent to have a bottle of water handy if the paper catches on fire.
 |
| Necessity is the Mother on Invention How to combat a windy day in Calgary when trying to keep a candle lit! |
 The metal look can be further enhanced with Rub and Buff,
Lumiere paints, mica powders and DecoArt Metallic Lustre.
We did discover that good old Elmer’s White glue
also worked, though you needed to let it dry as it was more liquid than the
tacky glue. Ultimately we felt that we got better soot coverage if both brands
of glue were left until virtually dry. Otherwise, you would get soot on the dry
areas, and the wet areas would burst and expose more glue, so you had to keep
burning the glue until it was dry and sooty. It would really depend on the look
you desired for the surface.
We even discovered that the technique worked on non paper
surfaces like MDF, canvas, and wood. Brown kraft paper boxes and other shapes
are much enhanced by this technique.
 |
| Brown kraft paper box with embossed sides. Burnt brown paper. |
 |
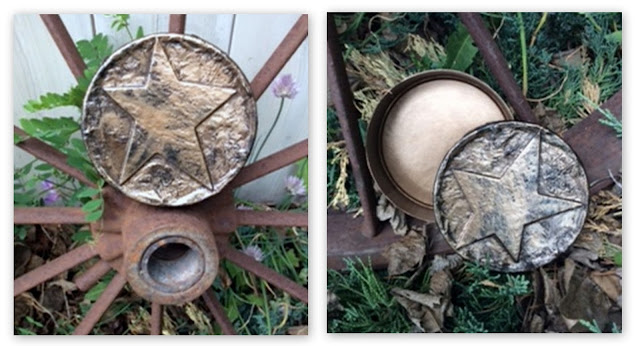
| Laughing Cow Cheese Box - burnt brown paper, grunge board star, buffed with DecoArt Metallic Luster in Espresso and painted inside with acrylic paint. |
Faux Leather – there are plenty of videos online about this technique and
it can be approached from many angles once you understand the basic concept.
Again we used brown paper, thick, thin, two layers fused together, card stock
weight etc. All will produce a good result and the choice will depend on the
end use.
Although some videos suggest the product to use is Ink
Refresher by Ranger, others simply used glycerin and water. We certainly
would recommend using the glycerin (cheaper and easier!), and not trying to
find the Ranger product which is not available in Canada. In a spray bottle mix
about 1 tbsp of glycerin with 4 ounces of water and shake. Spray the glycerin
water on both sides of the paper, making sure to wet the paper, but not dripping
wet. Massage the
wet paper gently. Repeat this once again, if necessary, until the paper is
darker in colour. Now crumple the paper in your hands. Flatten the paper out
again and repeat the process of spraying, massaging and crumpling at least once
more, perhaps a couple of times. As you continue to massage and crumple the
paper the paper fibres break down creating a very pliable paper with a nice
hand, somewhat like fabric. However, do not rub too hard or the paper
will start to break down.
You can spray colour on before you start the process or,
after each crumpling, rub an ink pad across the texture created by the
crumpling. You will likely work on the piece for some time before you have the
desired “faux
leather” look that you want. To repeat our caution - you can
overwork the paper and it may tear, so use a light hand.
 |
| Left, after acrylic wax was applied. Right, before. |
Another couple of great ideas that you might consider are:
running the paper through an embossing machine for added depth and texture. The
second idea is to rub an acrylic wax on the finished paper for a leather-like
look and feel, and to protect the colour.
 |
| Embossed brown paper faux leather. |
The final product could be easily stitched by hand or on a
machine and would make great journal covers.
From all of us at FOG, we hope you have a great summer.
I hope to do some random posts over the summer to keep in touch and we’ll return in
the fall with another year of FOG Tuesdays. Meredith and Jan


