 |
| Thanks for joining FOG for another year of mixed media and fibre arts play and creativity. |
Monday, 23 December 2013
Festive Greetings
Wednesday, 18 December 2013
Christmas Gift Picks for Mixed Media Artists
I was recently reminded of
a post that I made while taking an online paper-crafting course with Craftsy®.
I posted about two tools that I had “wished” for last Christmas and purchased
by “Santa” from Lee Valley Tools here in Canada. For those of us lucky enough
to live in a city with a Lee Valley store it’s a great place to go – they have
the most interesting tools, gizmos and gadgets. I also have several favourite
tools that my quilting alter ego likes to use and I will post about another
time. For those of you in the USA or abroad, don’t despair - Lee Valley does
mail order, though perhaps not in time for Christmas 2013!
Now to the tools!
 |
| Spiral Screw Punch |
The first is a Spiral Screw Punch® AKA a Japanese Screw Punch and is a great tool for fibre, mixed media and book
arts. At $39.50 it comes with 6 different sizes of cutters. It is a well made
product and robust enough to put holes in layers of fabric, through a hardcover
book cover or a stack of paper. It’s great to be able to punch holes wherever
you need to on your project when a conventional hand held punch will not reach.
It is made in Japan.
 |
| Speedy Stitcher Sewing Awl |
PS No kickbacks were received from Lee Valley. I’m just pleased with the price and quality of their products.
Tuesday, 17 December 2013
FOG Tuesday - UTEE™, Grafix™ Shrink Film
Who knew that 9 grown women could be entertained for a day with UTEE (Ultra Think Embossing Enamel), shrink plastic (a flashback to the past), a heat gun, a melting pot and alcohol inks?
After our November warm up collage we were ready to play. We were working with Melt Art™ Ultra Thick Embossing Enamel™ (UTEE) to create embellishments for future projects. Even if you don’t own a melt pot you can use UTEE a number of ways. We dipped or sprinkled, then heated with a heat gun. We melted it in a Ranger’s Melting Pot®, and then poured, dipped and let it dry. We stamped into it, poured it onto stamps, and anything else we could think of to try. You can also use the melting pot to shrink your Shrink Art Plastic.
After our November warm up collage we were ready to play. We were working with Melt Art™ Ultra Thick Embossing Enamel™ (UTEE) to create embellishments for future projects. Even if you don’t own a melt pot you can use UTEE a number of ways. We dipped or sprinkled, then heated with a heat gun. We melted it in a Ranger’s Melting Pot®, and then poured, dipped and let it dry. We stamped into it, poured it onto stamps, and anything else we could think of to try. You can also use the melting pot to shrink your Shrink Art Plastic.
 |
| A small sampling of the number of embellishments that were made with UTEE, Shrink Plastic and other mixed media items. |
 |
| Grafix™ Shrink Film - 3D Flower Painted with Alcohol Ink |
Everyone
had at least one sheet of Grafix™ Shrink Film to try. Jan also brought
along her Sizzix™ Big Shot machine and some dies, adding another dimension. Cutting
out a large flower from the shrink film, colouring it with ink, felt pen, or
even pencil crayons and then shrinking it with the heat gun was the start.
We
soon learned that we could manipulate the petals while they were hot. This
pliability does not last long, but we determined you could re-heat it if
necessary. Yet another interesting discovery! As you will see from the photos,
we did some amazing things that day.
 |
| A tidy work space is highly over rated! Creativity Rules! |
I
also wanted to leave you with a snapshot of a few of us busy working at our
tables.
We are messy, but Creative!
Monday, 16 December 2013
FOG Tuesday - Gelliarts™ Plates, Glue Gun Stencils and Mono Printing
While we were humming Baby It’s Cold Outside
things were heating up in our session last Tuesday. After our warm up collage (see previous post) we launched into using Gelliarts™ plates, glue guns and a plethora of other stuff
to make glue gun stencils and mono prints. For those of you who do not own
a Gelliarts™ plate, they are very cool, but if you are just mono printing you
can do much the same on a piece of plexi glass, glass or on a transparency.
However, if you are using the glue gun stencils you need a bit of the cushiony give
that the Gelliarts™ plates have and a large piece of fun foam gave some pretty
good results as Jan found out.
The first order of business was to make stencils using hot
glue by making designs onto a non-stick craft sheet or parchment paper. There
are several videos online where you can view this technique. Here is a link to
one on Diana Trout’s website where Jane Davies does an excellent demo.
 |
| Terri's Glue Stencil |
Type of glue gun stick did seem to make a difference so you
might want to be more organized than I was to know exactly what type of glue
stick that you had in order to track its success. Thinner lines, placed further
apart and a flatter end product seemed to act better as a stencil when put into
use on the Gelliarts™ plate. The stencils themselves ended up looking like art
as seen in this glue stencil of Terri’s.
 |
| Siri's Mono Prints on Paper Left with glue stencils and overprints, Right commercial stencil |
You can mono print onto hand made paper, fabric, card stock
or deli paper. The only problem with the fun and ease of using this product is
that you end up with a gazillion finished pieces and then you need to come up
with a gazillion projects to use them in.
 |
| Jan's Mono Prints on Paper and Fabric Left using Glue Stencils, Right using Foam Stamp on Fabric |
They will make great backgrounds in art journals,
greeting cards and fibre arts projects depending on the surface that was
printed on.
 |
| Diane's Mono Print on Paper with commercial plastic doily stencil. |
 |
| Terri's Mono Print on Paper using glue gun stencil and several over prints. |
Sunday, 15 December 2013
Fog Tuesday
With traffic crawling
along in Calgary on FOG Tuesday, we were late getting to the session. The roads
were very busy and extremely icy. At the suggestion of one of the group we had
a potluck for lunch – some very tasty offerings were sampled, though much to
our surprise no one brought dessert! That has to be a first with any potluck
that I have been to.
Design Element – Texture
 |
| Warm Up Collages - Design Element TEXTURE |
- Texture as an element of design can be visual or tactile.
- Visual texture might be achieved through colour or value, with darker areas suggesting depth. Some visual textures may be interpreted as tactile, for example the use of a smooth fabric that has a brick pattern may seem rough.
- Tactile texture is something that can be felt, for example the actual surface where your collage is built may have a texture of its own or you can add texture with embellishments, layers of paint or spackle. All fabrics are tactile with surfaces being rough or smooth.
- Each member took 30 minutes to complete a collage using texture as the primary design element in combination with one of the previous design elements of shape, colour or line.
Saturday, 7 December 2013
Arts Club at the Library
For a terribly cold, though sunny day we were pleased that
many of the regular Arts Clubs participants braved the cold to join us at the
Central Library for our fibre / mixed media project and the final Arts Club
session for 2013.
Each session the Calgary Public Library picks a theme for
their programming and the fall 2013 theme was Sight and Sound. We
decided on a reusable cotton bag with a music theme, focussing on historic
composers and modern day musicians who write their own music.

Participants were introduced to a number of techniques
including spray dyes, dye based stamp pads (we should have taken photos of our
hands!), embroidery stitches, the making of fabric yo-yos and the printing of
photos onto cotton fabrics and organza.
After that they their own creative juices began to flow and new
techniques were tried.

A couple of the participants utilized paper towels to
create their own masks for spraying and several used their yo-yo circles flat
as backgrounds to their photos. If you look closely at Bach he’s looking a
little glassy eyed with sequins and Beethoven’s bag is creatively aged with ink
for a vintage look.

The one and a half hours went by very quickly. While the
projects were not 100% completed I think that it’s safe to say that everyone
had a great time and will finish their projects at home.
Saturday, 16 November 2013
Arts Club at the Library
Back in June and July, (pre and post-flood Calgary) Jan and I did several workshops at library branches using readily available and cost conscious items to make creative mixed media brooches.
The first project that we did was a combination of a machine needle felted backing with hand embroidery stitches and embellishments. Each participant was given a square of the needle felted background and cut the shape they wanted for their brooch. Then they used embroidery floss to stitch, add beads or sequins and then blanket stitch around the edge to finish.
The second project was a mixed media piece with each participant given a rubber stamped impression of a lady's face in craft foam that they coloured with metallic markers. In their kit they were also given a variety of fibre pieces including a heat distressed piece of felt, organza, heat distressed and painted Tyvek. Several of the gals found them so fun that they made 2 of them.
 |
| Needled Felted and Embroidered Brooches |
 |
| Mixed Media Brooches |
The second project was a mixed media piece with each participant given a rubber stamped impression of a lady's face in craft foam that they coloured with metallic markers. In their kit they were also given a variety of fibre pieces including a heat distressed piece of felt, organza, heat distressed and painted Tyvek. Several of the gals found them so fun that they made 2 of them.
 |
| Zipper Brooches |
The final project that we did at several branch libraries was a brooch made with one side of a metal zipper, some heat distressed felt leaves, crystal brads and beads. We had several mom and daughter duos at one branch and even the little gals found this a relatively easy project to complete, with mom's help of course! They all went home with them proudly pinned to their backpacks.
Friday, 15 November 2013
Fog Tuesday
Design Element – Line
 |
| Warm Up Collages - Design Element LINE |
“ A mark, long in its
proportion to its breadth, made on a surface with a pen, pencil, tool, etc.”
- Lines can be thick or thin, open or closed, curved, angular, broken or solid.
- Lines can be parallel, directional, frenetic, controlled or textural.
- Line is most often used to define shape in a two dimensional artwork.
- Line is often referred to as “the most basic element of design” yet this simple element functions in complex ways. Used effectively, line expresses a variety of verbal and visual concepts. Line works either by itself or in conjunction with other lines to communicate messages and impact audience.
- Direction
- Vertical lines suggest strength and power. An example on line direction is this grouping of tall buildings, or a single tall building - lines going upwards, visually pulling your eye up. Line can be used to suggest the path your eye should follow and where it should rest.
- Horizontal lines symbolize tranquility and rest. This state reflects objects parallel to the earth that are “at rest in relation to gravity." Examples of horizontal lines are those in ocean waves and horizons.
- Diagonal lines convey a feeling of action or direction: (Lightning)
- Weight The weight of a line conveys meaning as well. Thinner lines suggest weakness, while thicker lines convey power.
- Emotion Lines can imply emotion such as fatigue, contentment, relaxation, or frustration. Long curvy lines suggest looseness.
- Focus A line draws the audience's attention to a specific object. An example is an arrow pointing to one man in a crowd. A more subtle example is a path leading to an abandoned house.
- Texture Finally, many lines work together to form texture, providing images with more depth.
Tuesday, 22 October 2013
Fog Tuesday
With the October exhibition
behind us we are finally able to catch up on some long overdue blog postings.
As Jan mentioned last month we decided to do a 30-minute warm up collage each session to reinforce Elements
and Principles of Design. In September we covered Shape and the Rule
of Thirds and in October we covered Colour and again used Shape
to focus the design.
Each person drew a monochromatic paint chip from the hardware store and was challenged to use that colour and incorporate a shape (element from the previous month) and complete their collage in 30 minutes.
Design Element – COLOUR
 |
| Warm Up Collages - Design Element COLOUR |
- As a design element, colour is likely the one that gets the most visceral response from a viewer. The liking or not liking of a quilt, art piece or garment can often be swayed by its colour.
- Colour may suggest a mood, convey an ethnic or cultural background or elicit a response that may have a psychological origin.
- Colours can be warm or cool, create the illusion of depth or luminosity or create a focal point in your piece.
- There are 12 colour HUES on a colour wheel made up of 3 primary colours (red, blue and yellow), three secondary colours (orange, green and violet) and 6 tertiary colours.
- Colours are further categorized as tints (white is added), tones (grey is added) and shades (black is added)
- There are a multitude of colour schemes, the most common ones being monochromatic, triads, complimentary, analogous, achromatic and polychromatic.
Bodacious Blooms
You may remember the posting on making felt flowers a while back. While I was making those flowers an idea "blossomed" (pun intended) and I suggested to Jan that we should do a joint project for the show on October 20. Now that the show is over we can finally unveil our arrangement.
It started by making a wet felted vessel for the vase and then finding a source for the non woven paper. We incorporated leaves and flowers made from commercial poly felt and the non woven papers. Both fibres can be easily cut with scissors or using Sizzix dies, can be stitched by hand or machine and heat distressed with our trusty heat guns. The final touch was the hot pink wire spirals.


It started by making a wet felted vessel for the vase and then finding a source for the non woven paper. We incorporated leaves and flowers made from commercial poly felt and the non woven papers. Both fibres can be easily cut with scissors or using Sizzix dies, can be stitched by hand or machine and heat distressed with our trusty heat guns. The final touch was the hot pink wire spirals.
 |
| "Bodacious Blooms" Meredith Helgeson and Jan Scruggs |


Needless to say we had lots of fun over the summer with this project and the day before launch day decided against trying to calculate how many hours we had put into it. Feedback on it was great at the exhibition and we even got the green thumbs up from floral arranger guru Arlee Barr (thanks Arlee!)
Saturday, 19 October 2013
Fibre Optics Group Exhibition
It's coming up quickly.
Here is a blurb on our show.
Please come and join us!!!

Here is a blurb on our show.
Please come and join us!!!

Saturday, 21 September 2013
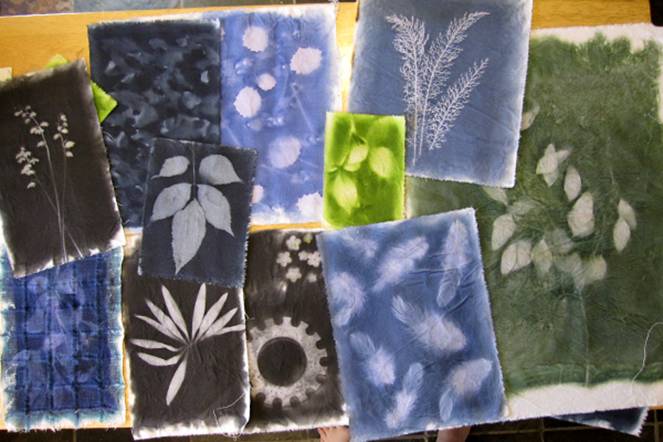
Sun Prints!
Last week, the Fibre Optics Group met for our fall kickoff. It was a warm sunny day, so we did sun printing, leaf and object printing as our technique exploration.
First, we started with a warm up exercise looking at the design element - SHAPE. We all know what shapes are, but sometimes we forget to seriously consider the different aspects of shapes when we are designing artwork. Shapes can be categorized as geometric, organic (realistic shapes in nature and man-made), and abstract. One of the interesting things about abstract shapes is that we all try to interpret them organically. For example, we can interpret a circle as a flower. Also shapes can represent values. We all understand that a square would represent stability or solidity, certainly not fluidity.
The Rule of Thirds was also introduced. The Rule of Thirds is a guideline used for composing visual images. This guideline suggests that you divide your image or background into nine equal parts by two equally spaced horizontal lines and two equally spaced vertical lines ( Making a grid). All your important compositional elements and your focal point should be placed at the intersections of the lines, or along the lines. This will create more interest and energy in your composition.
Our exercise was to use materials from a box of "stuff" on hand to create a 4" X 6" collage in 30 minutes. The collage was to illustrate the element Shape and the Rule of Thirds.
Next, on to SUN PRINTING!!
Everyone did some experimenting with the sun prints, and some of us continued to explore it over the next few days.
Here are some of the conclusions we have reached:
1. Sun prints are dependent on the amount of paint on the fabric. The wetter or more saturated the fabric, the better the print.
2. Objects that stick onto the fabric produce a much better print.
3. Paper with sizing does not seem to work. Paper without (like rice paper) will work really well, as does fabric that has been washed to remove the sizing.
4. Pebeo Setacolor Transparent Paint is what we used. However, Pebeo Setacolour Opaque paints, and chromacolour acrylic artists colour paint also work. All these paints are available at art supply stores.
5. The prints need to be set with an iron. One of our group did find that she ironed her prints, left them out in the sun and they faded. Not sure why that happened, but I plan to see if I can figure it out.
So, we would encourage all of you to try sun printing. You can really create some wonderful unique prints.
First, we started with a warm up exercise looking at the design element - SHAPE. We all know what shapes are, but sometimes we forget to seriously consider the different aspects of shapes when we are designing artwork. Shapes can be categorized as geometric, organic (realistic shapes in nature and man-made), and abstract. One of the interesting things about abstract shapes is that we all try to interpret them organically. For example, we can interpret a circle as a flower. Also shapes can represent values. We all understand that a square would represent stability or solidity, certainly not fluidity.
 |
| Warm Up Collages - SHAPE |
The Rule of Thirds was also introduced. The Rule of Thirds is a guideline used for composing visual images. This guideline suggests that you divide your image or background into nine equal parts by two equally spaced horizontal lines and two equally spaced vertical lines ( Making a grid). All your important compositional elements and your focal point should be placed at the intersections of the lines, or along the lines. This will create more interest and energy in your composition.
Our exercise was to use materials from a box of "stuff" on hand to create a 4" X 6" collage in 30 minutes. The collage was to illustrate the element Shape and the Rule of Thirds.
Next, on to SUN PRINTING!!
Everyone did some experimenting with the sun prints, and some of us continued to explore it over the next few days.
 |
| Some of the Sun Prints by FOG members |
1. Sun prints are dependent on the amount of paint on the fabric. The wetter or more saturated the fabric, the better the print.
2. Objects that stick onto the fabric produce a much better print.
 |
| Terri Heinrich's prints on rice paper |
4. Pebeo Setacolor Transparent Paint is what we used. However, Pebeo Setacolour Opaque paints, and chromacolour acrylic artists colour paint also work. All these paints are available at art supply stores.
5. The prints need to be set with an iron. One of our group did find that she ironed her prints, left them out in the sun and they faded. Not sure why that happened, but I plan to see if I can figure it out.
 |
| More prints done by Terri the next day |
So, we would encourage all of you to try sun printing. You can really create some wonderful unique prints.
Monday, 29 July 2013
Textures
Coming from a long career in quilting I understood that the
actual quilting was an integral part of the overall product, but was a
minimalist when it came to the quilting of my quilts, enjoying the process of
colour and fabric selection much more than the final quilting of the project. The choice
of thread colour and overall pattern added dimension and interest to the quilt
and the advent of free motion quilting and thread painting added much needed
depth and texture to an otherwise flat plane.
Now that I have mostly abandoned the making and quilting of large quilts and choosing instead to focus on smaller fibre art and mixed media pieces texture has become a very important aspect of the work. Texture can be added by using varied and interesting items such as threads, dimensional items like painted and heat altered Tyvek™ and Lutradur™, spackle, modeling paste, layers of papers, found objects, raised embroidery stitches and beads.
 These past few weeks I have been taking an early morning walk, mostly for the exercise, but as I was passing manicured gardens, broken brick
walls and construction sites I began to notice all the interesting textures
around me so have been taking my trusty little digital along to document them.
These past few weeks I have been taking an early morning walk, mostly for the exercise, but as I was passing manicured gardens, broken brick
walls and construction sites I began to notice all the interesting textures
around me so have been taking my trusty little digital along to document them.

Textures can be nature made, nature made and altered by nature, nature made and altered by man, man made, man made and altered by nature and man made and altered by man. Here are just a few of them.

I hope to translate these textures into my fibre arts and mixed media pieces over the next months..
Now that I have mostly abandoned the making and quilting of large quilts and choosing instead to focus on smaller fibre art and mixed media pieces texture has become a very important aspect of the work. Texture can be added by using varied and interesting items such as threads, dimensional items like painted and heat altered Tyvek™ and Lutradur™, spackle, modeling paste, layers of papers, found objects, raised embroidery stitches and beads.
 These past few weeks I have been taking an early morning walk, mostly for the exercise, but as I was passing manicured gardens, broken brick
walls and construction sites I began to notice all the interesting textures
around me so have been taking my trusty little digital along to document them.
These past few weeks I have been taking an early morning walk, mostly for the exercise, but as I was passing manicured gardens, broken brick
walls and construction sites I began to notice all the interesting textures
around me so have been taking my trusty little digital along to document them.
Textures can be nature made, nature made and altered by nature, nature made and altered by man, man made, man made and altered by nature and man made and altered by man. Here are just a few of them.

I hope to translate these textures into my fibre arts and mixed media pieces over the next months..
Sunday, 23 June 2013
FOG Tuesday - Citrasolv™
I’m a little behind in posting a blog about our activities
of June 11. We welcomed two new members to the group and had a great day
altering magazine pages with Citrasolv™. The resulting pages are quite
interesting and have, so far, retained the lovely light lemony scent of the
Citrasolv™. We have talked about Citrasolv™ in a previous post when were using it for
image transfers.
Choose magazine pages that are full of colour, as they seem
to work the best. National Geographic magazine has been touted as the best magazine to work with, though the year of publication and the inks that
were used at that time did seem to have some bearing on the outcome of our
altered pages. I used pages from a local arts magazine and those worked very
well.

The Citrasolv™ works by dissolving the inks on the page,
most notably black, so text pages will just end up a muddy mess. Liberally
apply the Citrasolv™ to the pages making sure that you have layers of newspaper
beneath as well as a plastic covering for your work surface. The solvent will
eat through certain types of vinyl gloves so try to find “nitrile” gloves, as
they are a synthetic rubber with no latex. Also use glass containers for the
solvent and natural bristle brushes.
Layer your pages face to face to that the magic starts to
happen and wait for about 20 minutes before you peek. Be prepared for a lot of
patience after painting your pages with the solvent as it does take some time
for the inks to start to move.

Peel apart your pages and set out to dry. Once they are dry you can use stencils, cotton swabs, more solvent or alcohol based hand wipes and
continue to alter the pages as seen in the photos to the left.
Citrasolv™ has become a mainstay in the tool kits for mixed
media artists and they even have an Artist’s Section on their website.
Thursday, 6 June 2013
The Thrill of the Hunt - May Giveaway Winner
We’re a tad late posting
the winner of the May giveaway – that funky set of rubber stamps - but today’s
the day!
For fun we checked on the
profile of a person born on June 6 and under career and finances this was the
comment “Try combining your natural gifts and abilities to take on a
new form of expression.” Given that
comment we thought that the set of rubber stamps was a perfect way for the
winner a way to express them self in a very creative manner.
Our winner for May is ICSPARROW. If you could send us your
snail mail address, we’ll get the stamps into the mail to you.
Thursday, 16 May 2013
FOG Tuesday + Tyvek Bead Tutorial
At our FOG session Tuesday, we spent most of
the day making beads. If you could roll it, paint it, glue it or melt it, we
tried it - paper, Tyvek™, fabric, magazine pages, paste paper, organza, plastic
bags and wool.

Tyvek™ Bead Tutorial
- Paint both sides of the Tyvek using metallic finish acrylic or Light Body Metallic Acrylic Lumiere™ paints by Jacquard™. Tyvek dries very fast and takes very little paint to cover it. Lumiere paints were especially wonderful as they combine a colour with gold, so you get a big bang for your buck, so to speak.
- Cut a piece of the painted Tyvek in a long triangle, about 1 ½" wide at one end and narrowing to a point at the other, or straight edge rectangle, about 4” – 5” by 1”.
- Snip along the sides of the triangle, putting 1/4 inch slashes either straight toward the middle or on an angle.
- Roll the
Tyvek around a bamboo skewer, or knitting needle, starting with the wide
end first and finishing with the pointed end. Pin the end with a straight pin to hold it
together.

- Using the heat gun, heat the bead. You will see that the Tyvek quickly melts to attach itself together, so you can remove the pin right away or wait until the bead is completely finished. The slashes you made along the Tyvek curl up and melt and create a really interesting texture to the bead.
- Wait until the bead cools, then remove it from the bamboo skewer by simply sliding it off.

Wow!
Aren’t these great? They are a perfect addition to your next jewellery or
mixed media piece.
Thursday, 2 May 2013
The Thrill of the Hunt
Jan and I just spent the weekend painting
and mark making at a class led by a surface design artist. So, having been
inspired by all kinds of mark marking, what better time to host a giveaway of a
set of funky clear cling stamps? I mentioned in the March Thrill of the Hunt Giveaway
that Jan and I like the serendipity of making a great find, especially at a
great price.

This month’s serendipitous buy is a set of stamps
from Autumn Leaves
by Rhonna Farrer called scribbles alphabet (a – z). The
value of this set is $15.00 - $29.99 depending on the source. We were lucky to
score this set at a drastically reduced price at HomeSense in Calgary, Canada.
If you are an avid scrapbooker or love to
use alternate media in your artistic endeavours, HomeSense and Winners stores
have been carrying an ever-changing stock of brand name supplies at a very
discounted price for some time now. Cardstock, stickers, pens and
embellishments from a variety of companies, Spellbinder’s dies ™, Martha
Stewart ™ and Fiskars ™ products are but a few of the brand name items
available. Stock changes constantly so you need to go often.
If you live in the US, stores such as Big
Lots, Overstock.com and Ross have similar great finds.
I am sure your mind is already thinking
about how you could use these stamps in your next project, and some lucky
reader will get their very own set this month. To qualify for the draw for this May
giveaway, you need to send in your best tip or trick for using alphabet stamps
in a mixed media or fibre arts project.
Our group of elves will pick the winner, which we
will announce here on the blog on June 1. Please don’t forget to leave us your email address so we can contact the
winner to arrange mailing the prize.
Monday, 22 April 2013
Earth Day
I know that Earth Day is about being green and striving to Reduce, Reuse and Recycle in all aspects of your life, but I just "attended" my first online webinar hosted by Michelle Brown from Mixed Media Art in Australia and Earth Day became something more global for me.
How much more part of Earth Day can you be when someone from "down under" can talk and interact with you from a time zone, far, far away on a topic of great interest to you?
Michelle's free, online tutorial Creating Layers was a great primer on the techniques and supplies needed and the fun you can have when creating layers in mixed media.
I especially appreciated her use of found objects and we share a passion for thrift when it comes to making use of items that you already have in your stash. This is surely in keeping with the spirit of Earth Day. Thanks Michelle!
Saturday, 20 April 2013
Fools & Their Tools
Since the last posting about our excellent adventure with the needle felting machine, we have each bought ourselves a new tool for our fibre arts arsenal.
Jan did the initial test drive and found the Pfaff Smart 350P to be a quiet little machine with lots of potential. It is referred to on the box, not as an embellisher or needle felter, but a punching machine.
I got mine out of the box today to give it a test run and broke one needle within minutes. The key is to take your foot off the foot pedal and let the needle mechanism raise to its highest point before you try to remove your piece.
The good news is that the needles are very easy to replace, the bad news is that they are about $3.75 each.
So Jan and I are ready to roll with the punches and we've promised each other that we need to use this new tool frequently in our fibre arts projects. I'm sure that the potential is limitless. Stay tuned...
Jan did the initial test drive and found the Pfaff Smart 350P to be a quiet little machine with lots of potential. It is referred to on the box, not as an embellisher or needle felter, but a punching machine.
 |
| Pfaff Smart 350P |
The good news is that the needles are very easy to replace, the bad news is that they are about $3.75 each.
So Jan and I are ready to roll with the punches and we've promised each other that we need to use this new tool frequently in our fibre arts projects. I'm sure that the potential is limitless. Stay tuned...
Monday, 15 April 2013
Embellishing / Needle Felting Machines
Following our introduction to 3-D needle felting in March we
decided to continue with that theme and do some form of flat felting in April.
For those of you who are not aware, (and I was one of them) there is a machine,
similar to a sewing machine, called an Embellishing Machine (Needle Felting
Machine,) that makes life a whole lot easier to do needle felting over a
large area. Many companies make them and the main difference between models
seems to be the number of needles they use – some have 5 needles and others
have 12. They use no thread, have no bobbin and have about the same amount of
space inside the arm of machine. You can see in this picture of Jan at the
machine what it looks like.

Diane has a HuskyStar by Husqvarna Viking and she
brought hers along to FOG on Tuesday for us to try. After having used it I
can’t imagine doing this by hand, even as small as a piece of felt.
Using a backing piece of felt or other fabric, you design
your piece by lying down and overlapping almost any items that you can think of
– as long as the needles can penetrate the item. We used yarns, paper napkins,
silk flower petals, wool roving, thread waste, ribbon, lace and all types of
fabrics. Once your design is completed you overlay the entire piece with
organza, tulle, netting – something that you can still see your items through,
but will enhance the piece. We used an article by Rebekah Meier from an
issue of Cloth Paper Scissors Magazine as a general guideline.
Then you take it to the machine and start to move the piece
around under the needles that are moving up and down quite quickly. For those
of you who free motion quilt, the process is about the same. We found that with
some of the overlays that it was helpful to lay down wisps of wool roving to
help the needles penetrate and hold all the layers together.
 Now that our base pieces are completed we will spend time
doing some hand stitching and embellishing with thread, beads, sequins and
other items. As our pieces are completed we'll post them on the blog.
Now that our base pieces are completed we will spend time
doing some hand stitching and embellishing with thread, beads, sequins and
other items. As our pieces are completed we'll post them on the blog.Sunday, 7 April 2013
Arts Club at the Library
What do you get when you mix a group of women with a morning
away from home, kids and chores, a gray day and a bag filled with colourful
supplies? You get intense stitching, bursts of laughter and a wonderful floral
memory.
Our Fibre Arts Frenzy day at the Central Library in Calgary
was to make a Soft Collage using a Fibre Optics Kit consisting of a
piece of heat distressed felt, dyed cheesecloth, silk petals and leaves,
embroidery thread and some wire to hang the finished project.
 Jan and I had made several samples as inspiration for the
group, but their own creativity took over and the results were awe-inspiring!
Jan and I had made several samples as inspiration for the
group, but their own creativity took over and the results were awe-inspiring!
While their projects were nearly finished in the session I’m certain that there
will be some additional finishing touches and a few embroidery stitches put
into place for final inspection and completion.
Thanks to the gals and to the library for another great session! Jan and Meredith
Monday, 1 April 2013
April Fool's Day Giveaway Winner - No Foolin'
Well, it's April 1 and time to announce the winner of our first "Thrill of the Hunt" giveaway in March.
We had a friend look at the three entries and she chose Phyllis for the variety of uses from her thrifty purchase of a bag of buttons. Phyllis, please send us your snail mail address and we'll put the non stick craft mat into the mail to you.
Thanks for participating and watch for another giveaway soon...
Sunday, 17 March 2013
The Wonders of Felt
I’m not certain when or who began making felt into yardage
or squares, but it seems to be a craft item that has never gone out of style.
Every church bazaar from the 50’s and 60’s had a variety of items made from
felt. I’ve been going through a pile of Better Homes and Gardens
magazines from that era and there are many items made from felt within their
pages. I know that I’ll be dating myself when I say that I still have my first
Christmas stocking, over a half-century old, hand crafted from wool felt and won by my mom at a
church bazaar. And who doesn’t remember the felt boards at school with
all the felt shapes and letters? (OK if you are a 30 something or younger you may not remember).
Felt is a very inexpensive and forgiving product to work
with. It doesn’t ravel and can easily be cut and sewn by hand. If you have
pinking shears you can cut decorative edges and it can be glued to join pieces
together. If you have one of the cutting systems that are now available
(Sizzix, Spellbinders etc.) that come with shaped cutting dies, you can also die cut felt shapes for your crafting projects.
In response to a blog reader question about the dry needle
felted flowers in the previous posting, I felt (no pun intended) that making multiple flowers from commercial felt would be a better way to go. I tried out a few of the
many styles of flowers made from this humble crafting item. Here are my
results.
 What turned out to be my favourite one is the Scalloped
Spiral.
What turned out to be my favourite one is the Scalloped
Spiral.
In the photos I used a 5” square of commercial acrylic felt.
- Fold your square into quarters and trim to a circle shape.
- Cut a very loose spiral from the circle, starting narrow and ending wider towards the middle. Don’t make too many rounds.
- Cut a scalloped edge on one side as shown.
- Starting with the narrow end line up the non scalloped edge and wind the cut spiral around the centre core. Continue until the entire spiral, except the very inner circle, is wound.
- Place a dab of hot glue at the final round to secure.
- Glue the flat bottom of the flower and use the remaining felt to cover the base.
 Variations of the Spiral Flower can be made with larger or
smaller circles, using pinking shears to cut the spiral or leave the edges
unscalloped, as in the two cream coloured blooms with the green felt leaves.
Variations of the Spiral Flower can be made with larger or
smaller circles, using pinking shears to cut the spiral or leave the edges
unscalloped, as in the two cream coloured blooms with the green felt leaves.
Directions for the other style of flower I tested may be found at
this site.
Friday, 15 March 2013
Because we FELT like it :)
 Tuesday was FOG day and Jill, our talented needle-felting
member, first gave us a demo of the types of wool, yarns, tools and tricks of
the trade used in needle felting. Jill normally works in 3D so started us off
with making a ball that turned into a rather frightening little monster. I can
see that these would be a favourite with kids.
Tuesday was FOG day and Jill, our talented needle-felting
member, first gave us a demo of the types of wool, yarns, tools and tricks of
the trade used in needle felting. Jill normally works in 3D so started us off
with making a ball that turned into a rather frightening little monster. I can
see that these would be a favourite with kids.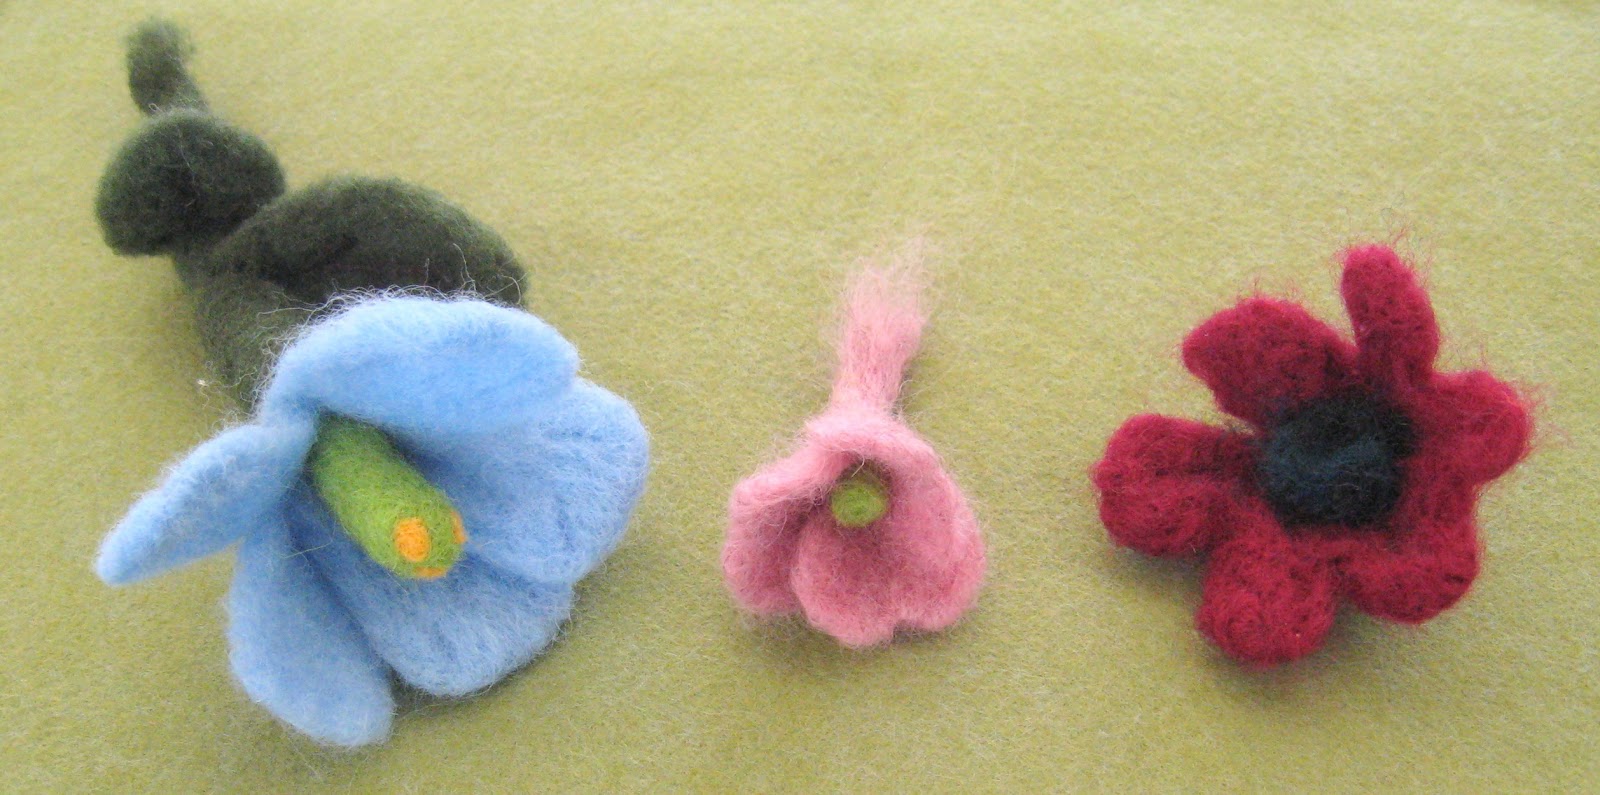 As we would not likely use these monsters in a fibre arts
piece, we also tried our hand at making a 3D flower.
As we would not likely use these monsters in a fibre arts
piece, we also tried our hand at making a 3D flower.
We spent the rest of the time experimenting with needle
felting a variety of fabrics and fibres into other background fabrics. Diane
was most creative with her butterfly. She had been making a pair of socks and
didn’t like the toe so cut it off and needle felted into some wool fabric.

We enjoyed the day so much and could certainly see the
potential for our fibre arts projects so we have decided to take a trip to the
Carstairs Woolen Mills to buy more wool roving and dedicate part of our April
FOG day to working with this medium again. It might be advised to update your tetanus shot as the potential for sticking yourself with the felting needles is quite high. Ask us how we know!
Subscribe to:
Posts (Atom)