 |
| Vintage Vogart™ Panel Merry Christmas from Jan and Meredith Join us in 2016 for our continued mixed media madness and fibre arts activities. |
Tuesday, 22 December 2015
Merry Christmas!
Sunday, 13 December 2015
FOG Tuesday - Bead-azzled
Our December FOG session was a wonderfully calm warm day for
December, which turned out to be a great help as we had a lot of people making
beads with the heat guns and we were able to do that outside.
We started as usual with our embroidery stitch warm up. Our
stitch for the day was the Danish Knot Stitch. This is an easy knot and thoughts were percolating around which
project to use it on by using it to create some texture, particularly when it
stitched in groups.
 Next we started making beads. There was a plethora of
materials provided for those who got kits and no one was able to use everything!
Next we started making beads. There was a plethora of
materials provided for those who got kits and no one was able to use everything!
The basic process is to wrap your material around a knitting
needle or bamboo skewer. Depending on the material, you can glue it,
or use a heat gun to bind the materials together. Possibilities abound, limited only by one’s imagination. As you can see from the photos, many different types of beads were created.

Once completed, the bead was coated with Triple Thick by Americana to add a glossy finish to the bead. This
product is a thick varnish which can also be used like glue. After the first
coat the bead can be rolled in seed beads, or micro beads, while the coating is
still wet. Once the first coat is dry, another top coat can be added to really
seal in the beads. Another finishing touch was to wrap around the bead, by
itself or with seed beads threaded onto the wire.
Some of the materials used to make our beads included: Tyvek,
plastic film, plastic sheet protectors, shrink film (in clear and matte),
security envelopes, origami paper, newsprint, abaca mesh and paper, angelina
(or Textiva) film, Angelina fibres, polyester fabric, wire, dryer sheets,
needle felted organza, sequin waste, organza fabric, painted Lutradur, painted
fusible web, tissue paper, felt sewn with a decorative stitch, and corrugated
paper.
These will be great to use on mixed media or fibre art pieces or in jewellery.


The possibilities are endless and we really only scratched the
surface, in spite of the quantities of beads created.
We finished off the day with a present to everyone of an organza
ribbon necklace for that special bead!
Monday, 9 November 2015
FOG Tuesday – Adding Texture and Dimension with Modeling Paste
The October FOG
Tuesday was spent experimenting with the application of dimensional molding or
modeling pastes on fabrics and other substrates. Depending on the brand used, these
pastes are called by different names.
These are a few that
we tried:
- Golden™ – HeavyGel Matte
- Golden™ – Coarse Modeling Paste
- Golden™ – Fine Pumice Gel
- Liquitex™ –Modeling Light Paste
- DAP DryDexSpackle™
- Poly Filla™ (dry powder in the box)
- Easi-Fil Drywall Compound™
- Elmer’s White Glue ™
- Mixtures of the white glue, Poly Filla™, and Easi-Fil™ Drywall Compound
The key word to look for in the description of the products
is “flexible”. Several of the
products cracked when the fabric was folded. Some of my samples have cracked but
have not flaked off the fabrics. The more flexible the product remains on your
fabric, the more it will accept hand or machine stitching.
We also tried a variation of a mix suggested in Stitch with the Embroiders’ Guild Magazine.
This consisted of Poly Filla™,
white acrylic house paint/primer and white glue. We finally decided on a
mixture of drywall compound, Poly Filla™
and white glue as the mixture that added some flexibility to the drywall
compound. We did not really see the need to add the white paint, as it diluted
the solution too much. The Poly Filla™
was useful in making the mixture the right consistency, as the white glue also
thinned out the drywall compound. While this did work, you need to mix it and
use it the same day as it tends to harden overnight. A couple of our members
found that by mixing this compound with a runnier gel medium that it worked
quite well.
Any of these
products can be mixed with a colourant. We tried inks, walnut ink, craft
acrylic paint and Lumiere™ paints to name a few. Remember that any liquid will change the consistency of the product, so
start with a light hand.
To apply the
products to the fabrics you will need a credit card to squeegee the product
through your stencil of choice, commercial or hand cut. Thermofax™ screens DO
NOT work. Be certain to have a dishpan of water nearby so that you can put your
stencils in right after use so that the products do not dry as the stencils could
be permanently damaged.
Below you can
see several items that we used as stencils.
 |
| Brass dry embossing stencils, sequin waste, commercial stencil, plastic canvas. |
You can also use
ConTact™ paper masks as a stencil. We cut the stencils using Jan’s Sizzix Big
Shot™. You will get both a positive and a negative stencil to use. Peel the
backing off the mask and place sticky side down onto your fabric. Lay a stencil
over the mask (sequin waste works well) and draw the product over the stencil
with a credit card. It also worked well to lay down the
sequin waste, and then use a stencil over top of that.
 |
| Sizzix Big Shot, ConTact Paper stencil, positive and negative ConTact paper stencils. |
We also tried spreading the mixture over hand stitching, and
also stamping into it. These created some very unique textures. The stitching
was visible through the compound, but more subdued. The stamps did not produce
a clear imprint, but definitely created additional texture. Again, remember to
immediately wash your stamp.
We tried this
process on a number of different fabrics and they all appeared to take the
product quite well.
These are a few
that we tried:
- Decorator fabric samples (finally a use for some of the 400 I have sitting in my hall)!
- Cotton Canvas
- Acrylic Felt
- Interfacing
- Lutradur
- Burlap
- Cotton
- Timex
- Hard paint canvas
 |
| Diane's on Black Interfacing, Margaret's on Decorator Fabric Sample, Gillian's on Lutradur-like Fabric. |
 |
| Jan's Samples |
Modeling/molding paste is certainly one way to add texture
to your artwork. The ease of colouring it with inks and paints makes it easy to
use, and gives you lots of options for adding it. There were lots of
possibilities suggested to take this technique further!
Monday, 12 October 2015
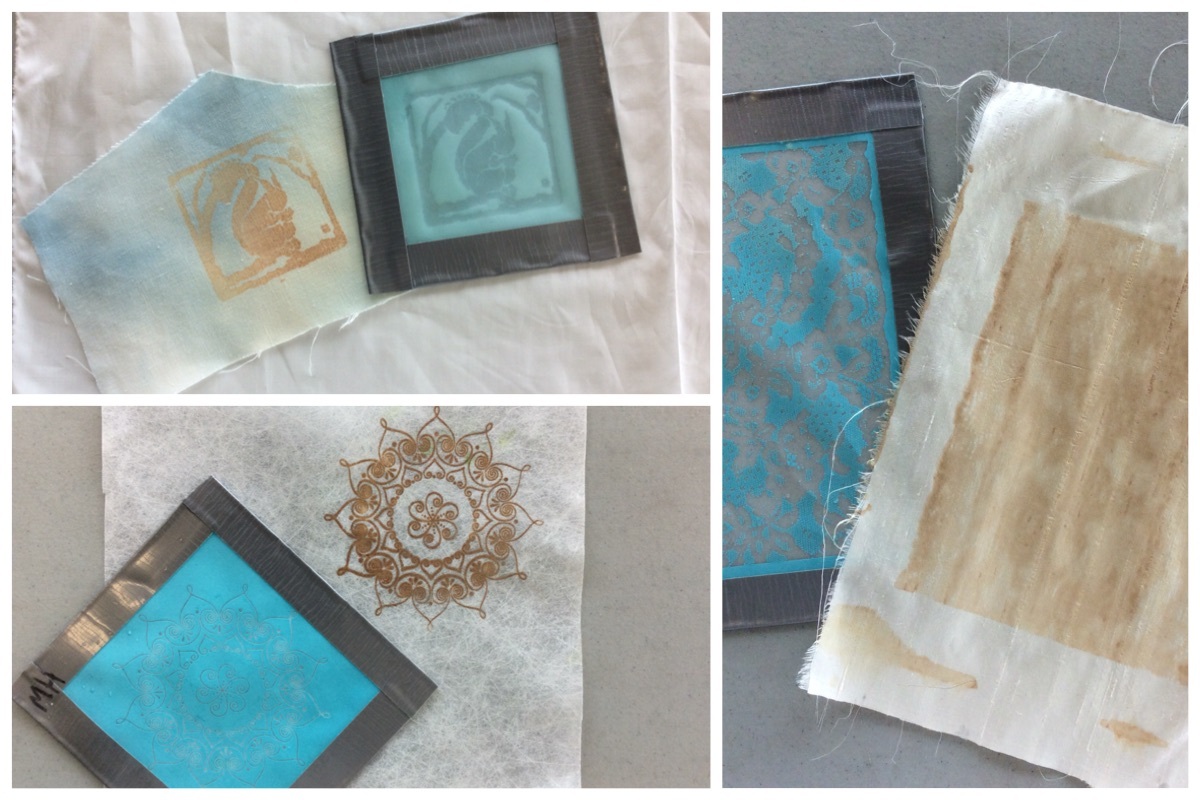
FOG Tuesday – Lemon Juice Printing
I have no idea where September went and here it is Canadian
Thanksgiving and our next FOG Tuesday is just around the corner!
Please visit Jan’s blog to get the finer details of how to
make the printing mediums that we used along with lemon juice and heat to
create these interesting and magical prints on fabrics and paper.
 |
| Commercial Stencils |
We used commercial and handmade thermofax screens and
commercial stencils for our designs. If you aren’t sure what a thermofax is or
how it is made, visit our blog posting here.
 |
| Thermofax Screens |
Plaid Enterprises, along with Martha Stewart, has created
adhesive silkscreens that are used like a thermofax screen. Whether they are
still available I’m not sure as the ones we bought were on clearance at
Michael’s. The screens are made more durable by putting an edging of duct tape
on all sides.
 |
| Top: Lemon printing on fabric Bottom: Lemon printing on silk and silk organza. |
Until next time…
Sunday, 4 October 2015
Alberta Culture Days
Jan and I were asked again this year by the Calgary Public Library to participate in Alberta Culture Days here in Calgary and we presented "We're On Pins and Needles" to full classes at two libraries in the city.
We had the participants make a pin cushion using a mason jar and used two different techniques to embellish them.
The first was embossing on velvet, a technique used from early days to embellish the inside of an embossed leather frame photo case holding a tin type photo. These were certainly in use since the days of the American Civil War and would have been carried by soldiers and others to remember their loved ones.
This technique would have used a metal roller to emboss the velvet. We are using a modern day version, using a red rubber stamp.
Rayon acetate is the best velvet to use, however, this technique also works on cotton velveteen. Try other types of velvet as well and a good source of good velvet are clothing items found at thrift shops.
The second technique that we used was embroidery in a colour that would enhance and not compete with the embossed velvet. We used french knots and stars.
Finish off with a pair of folding scissors, pins, needles and thread and you have a great gift for that sewing fanatic in your life. After all Christmas is coming....

We had the participants make a pin cushion using a mason jar and used two different techniques to embellish them.
The first was embossing on velvet, a technique used from early days to embellish the inside of an embossed leather frame photo case holding a tin type photo. These were certainly in use since the days of the American Civil War and would have been carried by soldiers and others to remember their loved ones.
This technique would have used a metal roller to emboss the velvet. We are using a modern day version, using a red rubber stamp.
Rayon acetate is the best velvet to use, however, this technique also works on cotton velveteen. Try other types of velvet as well and a good source of good velvet are clothing items found at thrift shops.
 |
| Tin type of my grandfather and great grandmother Hatchell, circa 1884. |
The second technique that we used was embroidery in a colour that would enhance and not compete with the embossed velvet. We used french knots and stars.
Supplies:
·
6” square of Velvet, rayon/acetate
is great to use, but is hard to find. You can also use cotton velveteen with
decent results, depending on your rubber stamps
·
Rubber stamps, clean images with
good lines
·
Spray bottle with water
·
Iron
·
Wide mouth mason jar with ring and
snap lid (250 ml)
·
Glue or glue gun to add the circle
of felt onto the bottom side of the ring to finish it off.
·
Stuffing - polyester fibre fill
·
Matching embroidery thread, you
want to add texture with your embroidery, not take away from the embossed
image.
·
We used # 12 perle cotton. 4"
or 5” embroidery hoop.
· Strong thread to gather velvet..
Directions:
1. Fold your square of velvet in half both ways and pinch
to determine the centre of the square. Mark with a pin, if desired.
2. Select your stamp of choice, placing it right side up
on the ironing mat. Lightly spray with water. Place your square of fabric, plush side down and centered on your rubber stamp and
lightly spray with water. Remove pin, if used
3. Carefully place the iron on top of the stamp and
velvet and press hard for about 10 seconds. Do not move the iron. Lift the iron
to see that you can see the impression of the rubber stamp on the back side of
the velvet. If it looks good then remove the velvet. If not, press again for a
few seconds.
4. Place embossed velvet into the embroidery hoop. Do a
random combination of French
Knots and Stars around the embossed image.
5. Rough cut your velvet square into a circle, by
trimming the corners. Do not remove a lot of fabric, as it is necessary to have
enough to cover the edges of the lid by at least a 1/2” all around, after the
stuffing is inserted.
6. Thread a needle with a doubled, strong thread and do a
gathering stitch around the circle about 1/4” away from the edge.
7. Gather up the velvet to make a pouch and place your
stuffing into the velvet trying to make a nice round shape.
8. Place the metal lid into the velvet, with the printed
top of the lid next to the stuffing, and gather up tightly, adjusting as
necessary. Your fabric will cover 1/2” to 1" of the bottom of the lid
all around. Knot and cut your thread.
9. Place the outer ring over the gathered piece. Make any
adjustments necessary to centre your embossed motif.
10. Cut a circle of felt slightly smaller than the lid and
glue/glue gun to the back of the gathered velvet and exposed lid.
 |
| Steps 1 - 3 |
 |
| Steps 4 |
 |
| Steps 5 - 10 |

Friday, 12 June 2015
FOG Tuesday - Amazing FAUX
June marked our
last session until September and we started out with a very cool embroidery
stitch, the DrizzleStitch. It is a 3-D stitch and garnered a lot of
laughter while we were stitching. As a 3-D stitch we could see that there were
lots of possibilities for its use on fibre art or other mixed media projects
where stitching could be used.
Our final projects for the season were both FAUX in nature,
the Aleene’s Original Tacky Glue brown paper burning technique that
emulates metal and the making of faux leather, also with brown paper. The
latter conjured up many possibilities especially for those of us who stitch, as
the final result was a very robust paper that felt and looked like leather.
More on both techniques….
Aleene’s Original Tacky Glue – Google
Burnt Brown Paper for the
entire story of when and how this technique came to light. The gist of the
technique is to cover brown paper with a generous slather of the tacky glue and
then hold it over an open flame. As the glue dries it bubbles and the soot
created by the candle flame blackens the entire surface. Make sure to move the
paper around so that you do not burn through your paper, though that and burnt
edges make for some interesting effects. Buff off the soot and you have this
amazing metal look. For more texture, you can move partially dry glue around to
create ridges.
 |
| Burnt brown paper with a variety of finishes. |
 |
| Aleene's Original Tacky Glue directly onto MDF. Glue was burned and heavier glue manipulated for texture. A variety of metallic finished were applied. |
A couple of cautions going forward with this technique – work
in a well ventilated area, preferably outside and NOT on a windy day. It might
also be prudent to have a bottle of water handy if the paper catches on fire.
 |
| Necessity is the Mother on Invention How to combat a windy day in Calgary when trying to keep a candle lit! |
 The metal look can be further enhanced with Rub and Buff,
Lumiere paints, mica powders and DecoArt Metallic Lustre.
The metal look can be further enhanced with Rub and Buff,
Lumiere paints, mica powders and DecoArt Metallic Lustre.
We did discover that good old Elmer’s White glue
also worked, though you needed to let it dry as it was more liquid than the
tacky glue. Ultimately we felt that we got better soot coverage if both brands
of glue were left until virtually dry. Otherwise, you would get soot on the dry
areas, and the wet areas would burst and expose more glue, so you had to keep
burning the glue until it was dry and sooty. It would really depend on the look
you desired for the surface.
We even discovered that the technique worked on non paper
surfaces like MDF, canvas, and wood. Brown kraft paper boxes and other shapes
are much enhanced by this technique.
 |
| Brown kraft paper box with embossed sides. Burnt brown paper. |
 |
| Laughing Cow Cheese Box - burnt brown paper, grunge board star, buffed with DecoArt Metallic Luster in Espresso and painted inside with acrylic paint. |
Faux Leather – there are plenty of videos online about this technique and
it can be approached from many angles once you understand the basic concept.
Again we used brown paper, thick, thin, two layers fused together, card stock
weight etc. All will produce a good result and the choice will depend on the
end use.
Although some videos suggest the product to use is Ink
Refresher by Ranger, others simply used glycerin and water. We certainly
would recommend using the glycerin (cheaper and easier!), and not trying to
find the Ranger product which is not available in Canada. In a spray bottle mix
about 1 tbsp of glycerin with 4 ounces of water and shake. Spray the glycerin
water on both sides of the paper, making sure to wet the paper, but not dripping
wet. Massage the
wet paper gently. Repeat this once again, if necessary, until the paper is
darker in colour. Now crumple the paper in your hands. Flatten the paper out
again and repeat the process of spraying, massaging and crumpling at least once
more, perhaps a couple of times. As you continue to massage and crumple the
paper the paper fibres break down creating a very pliable paper with a nice
hand, somewhat like fabric. However, do not rub too hard or the paper
will start to break down.
You can spray colour on before you start the process or,
after each crumpling, rub an ink pad across the texture created by the
crumpling. You will likely work on the piece for some time before you have the
desired “faux
leather” look that you want. To repeat our caution - you can
overwork the paper and it may tear, so use a light hand.
 |
| Left, after acrylic wax was applied. Right, before. |
Another couple of great ideas that you might consider are:
running the paper through an embossing machine for added depth and texture. The
second idea is to rub an acrylic wax on the finished paper for a leather-like
look and feel, and to protect the colour.
 |
| Embossed brown paper faux leather. |
The final product could be easily stitched by hand or on a
machine and would make great journal covers.
 |
| Brown paper faux leather. It has a wonderful feel to it when finished. |
From all of us at FOG, we hope you have a great summer.
I hope to do some random posts over the summer to keep in touch and we’ll return in
the fall with another year of FOG Tuesdays. Meredith and Jan
Monday, 1 June 2015
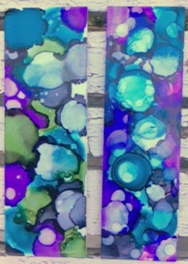
FOG Tuesday - Fun with Alcohol Inks
Once
our stitching was over we started with a demo on
alcohol inks by Karen Biko, one of our talented artists in the group. Karen demonstrated on a
variety of surfaces, each having their own qualities for the outcome of the
project.
 |
| Karen at work. |
 |
| Karen - work in progress, |
Working
with alcohol inks, Karen Konjurs up some amazing and Kolourful Kreations. These
art pieces are rather serendipitous in nature and she often works on several at
a time moving between them to add layers of new colour and texture.
 |
| Karen Biko |
Another
of our talented artists, Terri Heinrich, also works in alcohol inks (and other
mediums), but her creations are more realistic. Visit her site to see her unique style.
 |
| Terri Heinrich |
These
are several of the many surfaces that we experimented with:
· Glazed Ceramic Tiles
·
Vellum Paper and Transparencies
·
Glossy Photo Paper
Yupo
was the favourite paper, retaining the bright colours that alcohol inks are
known for.
Terra
Skin, the stone paper, has an unusual feel to it – described as “buttery” the
inks seemed to melt into the paper and lost their intense colour.
 |
| Muted Colours on Terra Skin. |
The
Strathmore Palette paper retained the colour nicely and the finished product
would be a great surface to mono print on or to use as pages in a journal.
The
glazed ceramic tiles turned out great, maintaining the brilliant colours of the
alcohol inks. They would need to be sealed with a fixative so that they remain permanent on this surface.
 |
| Glazed Ceramic Tiles |
 |
| Glazed Ceramic Tiles |
The
Vellum paper took the inks nicely, providing a translucent background that you
could stamp and heat emboss onto. These would make nice additions to a greeting
card. The transparencies worked in a similar nature to the vellum and would be
great for layering over other surfaces.
 |
| Alcohol inks on patterned vellum paper with rubber stamped and heat embossed image. |
 |
| Alcohol inks on heavy weight vellum with rubber stamped and heat embossed images. |
Lastly, glossy photo paper is an inexpensive way to experiment with some of the
techniques we did on the other surfaces. Rubber stamped with an image, and die
cut or edge cut with a decorative punch, they would make great greeting cards
or additions to your journaling pages.
There
are three main brands of alcohol inks that we used:
- Adirondack Inks ™ by Tim Holtz
- Copic Inks ™ by Copic (their refills give the best value)
- Pinata Inks ™ by Jacquard
All
worked equally well, though Copic has the best colour range.
Each
brand also sells a blender solution that helps make the colour more
transparent, but most of us worked with rubbing alcohol
which worked as well as the blender solutions but has a much lower cost.
Other supplies that are useful:
·
a thin paint brush to draw fine lines to outline
areas in your piece
·
a straw to blow the drops of ink to create
interesting lines and edges
·
a spray bottle with 90 or 99% rubbing alcohol.
If
colour is something that brings joy to your day then give this technique a try.
You don’t need
to be an artist to do it. It will bring back all the “oohs and aahs” you remember from third grade
art class.
 |
Remember
when working with rubbing alcohol, work in a well ventilated room.
Monday, 27 April 2015
FOG Tuesday - Not Con"fusing" at all...
We
started our day as usual with Jan teaching us a new embroidery stitch, this
time the Closed Cretan Stitch. We all agreed that it was a pretty stitch and
would be very versatile in borders and making leaves. Donna commented that she
had always made leaves with a satin stitch and that this would be her new go-to
stitch for leaves in the future. It was particularly attractive when
embroidered in variegated thread and depending on the length of stitches used
on either side of the braided centre line and how close you made the rows of
stitches it would have a variety of looks.
 |
| Mark making on our layered pieces. |
While we were small in numbers, we
were huge in enthusiasm when it came to our main FOG Tuesday project.
As always
when working with a tool that burns, we had to be mindful of good ventilation
and NOT triggering the smoke alarms. In this case it was soldering irons,
melting, fusing and mark making our sandwich layers of stitched acrylic
felt, synthetic organza, Angelina© fibres and film, lamé, Lutradur©,
Evolon© and other
materials that would burn or melt.
 |
| Wire wool to clean soldering iron tip. |
Remember to have a container with wire wool in it to clean the melted residue off the tip of your soldering iron.
The basic technique was learned from
the two books by British textile artist Margaret Beal. You
can access two short videos by Margaret on YouTube.
 |
| Stitched layers by Jan. |
The
more layers the better as it gives you more areas to “excavate” your final
piece. Once you have all your layers, stitch a pattern on the surface using
cotton thread. This is important as you do not want the thread to melt while
you are burning out the pattern.
 |
| 3-D flower "stitched" by Chris. |
Keep
a look out for metal items that can be used as stencils with the soldering
iron. The daisy stencil was a decorative insert for a Ball Mason jar and can be
found at craft stores. You can see that you can use it for both a positive and
negative outcome. You will also need a metal ruler or straight edge and a
surface to work on. I used a square of marble; others used a glass cutting
board.
 |
| Metal items to use as stencils: Ball Mason jar insert, metal drain cover, vintage drill bit measuring tool and draftsman's metal erasing shield. |
 |
| Fibre layers ready for burning. |
I
can see this technique finding its way into future textile and mixed media projects.
Subscribe to:
Posts (Atom)