Merry Christmas
 |
Thanks to all for visiting
with FOG for another
year.
|
Saturday, 20 December 2014
Monday, 15 December 2014
FOG Tuesday Collage Exercise
Well, this is our final Principle of Design in our series of Elements and Principles of Design. We've enjoyed the time spent on these collages over the past months and have learned a lot about design in the process. The Principle was Depth and Space.
Unless we work in 3 dimensions, work on a canvas is only 2 dimensional. We can only convey space and depth with visual cues.
There are a number of ways that you can do this incorporating many of the Element and Principles of Design that we have done over the past months.
 |
| Warm Up Collage Design Principle - Depth and Space |
The most common ways are:
·
Overlapping objects to suggest depth.
·
Creating shadows.
·
Size of your subject matter, sometimes in
conjunction with a known object.
·
Colour can suggest depth, where
warm colours appear to advance and cool colours recede.
·
Depth of field. If your object is out of
focus it seems that it is further away.
·
Where an object is on your page or canvas.
Towards the bottom they will appear larger and smaller towards the top.
·
Use perspective to indicate depth or
distance.
Stay tuned in 2015 to a new series of warm up
exercises that we will be working on during FOG Tuesdays.
Monday, 1 December 2014
Calgary Public Library - Meet the Maker - Session Update
The Calgary Public Library is offering a number of “Meet the Makers” events over the next six weeks and Jan and I have been invited to lead two of the sessions.
These sessions are a chance for library patrons to meet us and for you to learn a new skill with these easy make-and-take projects.
Wire and Bead Pendant Session
This session has been rescheduled to Tuesday, December 16 from 11:30 AM – 1:30 PM at the Central Library downtown.
Tuesday, 25 November 2014
Calgary Public Library Sharpie Marker Dyeing Project
This past Saturday was the last of 7 sessions for the Calgary Public
Library using Sharpie Markers™ and
rubbing alcohol to create a lot of interesting patterns. Our original project,
a cotton scarf, often morphed into just having a lot of fun making marks
on the 100% cotton fabric and adding 99% alcohol with an eye dropper to see how
the Sharpie pigments moved.
Let me tell you about our 2 main supplies – we did use Sharpie™ Markers for this project, but any alcohol based
marker will work. Bic Markit™, Copic™ and Spectrum
Noir™ are others that you can use. Sharpies™ and the Bic Markit™ alcohol
markers can often be found on sale at Staples here in Canada.
The second ingredient is rubbing
alcohol, and if you read our post in June of this year you may remember
that rubbing alcohol comes in three main strengths, 70%, 90% and 99%. We used
the 99% for this project and used an eye dropper to drop it onto the marker
ink. Rubbing alcohol (perhaps due to its therapeutic use) also has an expiry date,
so it’s probably wise to buy a fresh bottle for this project. Costco here in
Canada has the best price and does sell the 99%, where many pharmacies do not.
The rubbing alcohol pushes the marker pigment concentrically away
from the drop location so you can experiment with where you are making your
alcohol drops for different effects. If you want to repeat a motif, it’s not a
bad idea to do a sample piece with your motif before and after dropping the alcohol
so that you remember how you made it.
Other supplies needed are 100% cotton, an eye dropper, a table
covering and a good supply of fresh air!
We also did this project at our June FOG group on silk scarves, so
visit that posting if you want to know more about doing this process on silk.
Although many finished a scarf during the session, we only had the
pleasure of seeing one of our participants wearing her creation as she brought
the finished piece to another session. As you can see from the photo below, she
folded the 54” piece of cotton in half lengthwise, sewed around it, right sides
together and then turned it right side out. She then did a beaded fringe on one
end only and lovely beading up the seam side. Folding it gave it a nice feel
and the beaded fringe some nice weight.
 |
| Carleen's finished Scarf with beaded fringe |
What follows are some awesome examples of motifs that our
participants came up with.
 |
In each pair, the motif before the alcohol was dropped is on the left,
after the alcohol was dropped is on the right
|
 |
In each pair, the motif before the alcohol was dropped is on the left,
after the alcohol was dropped is on the right. In the bottom example,
the drawing was enhanced with black marker lines after the alcohol was dropped.
|
 |
In each pair, the motif before the alcohol was dropped is on the left,
after the alcohol was dropped is on the right.
|
Other uses for the decorated cotton could be quilt blocks or small
fringed pieces for the fronts of cards.
 |
| Joan's southwest sunset. |
Once all the decoration is completed,
let your cotton dry thoroughly overnight and then heat set with your iron set
on the cotton setting. Once heat set, they are washable and the colours will
not run.
Tuesday, 18 November 2014
Calgary Public Library:Meet the Maker Sessions
The Calgary Public Library is offering a number
of “Meet the Makers” events over the next six weeks and Jan and I have been
invited to lead two of the sessions.
These sessions are a
chance for library patrons to meet us and for you to learn a new skill with
these easy make-and-take projects.
Our sessions are:
Wire and Bead Pendant: Monday, December 15th from 1 – 3 PM at the Central Library downtown
 |
| November 24 Central Library "Meet the Maker" Two decorated and completed recycled jean journals. Journals were bound using a 3-hole pamphlet binding. |
We
hope to see you there and we’ll be back in 2015 at the Saturday Arts Club at the Central
Library with 4 new projects!
 |
| Recycled Jeans Journals |
Monday, 17 November 2014
FOG Tuesday Collage Exercise
We’re
nearing the end of our exploration of the Elements
and Principles of Design with our look at Balance and Symmetry.
Balance can be achieved
in an art piece using any number of the following criteria:
·
position
- an element further from centre is heavier
·
texture - complex
texture has visually more weight
·
value -
darker is heavier
·
quantity
- multiple small objects balance one larger object
·
size
- larger appears visually weightier
·
shape - simple
shapes are lighter than more complex shapes
·
colour - brighter
and more intense colours are visually heavier
·
isolation
-
an isolated elements has more weight
·
value
contrast - the higher the contrast the more weight
·
orientation
- diagonal orientation is heavier than vertical or horizontal orientation
 |
| Warm Up Collage Design Principle - Balance and Symmetry |
Symmetry
in a piece of art can take on a number of different forms:
·
Radial - elements radiate out
from the centre
·
Symmetrical - reversing the design,
or having elements of equal weight along the vertical or horizontal axis
·
Asymmetrical - considering the
influences above, balance is achieved using disparate elements
·
Crystallographic - allover pattern,
repeating elements like a quilt
·
Unbalanced - can be specifically used to
create a disturbing or uncomfortable effect
Saturday, 18 October 2014
FOG Tuesday – Creating with Crayola™
I’ve
said this before when discussing our FOG Tuesday activities,
but it bears repeating, “Who knew that a group of women could have so
much fun for an entire day...with a shiny new pack of Crayola™ crayons, some fabric, paper, heat guns, rubbing
plates and more?” Well we were those women last Tuesday at FOG.
It started with a
short show and tell of some things that Jan and I had tried before the session
and ended the day with a myriad of brightly coloured and very creative pieces,
some requiring some additional embellishments, and some nothing more.
Methods seemed to
group into direct application of crayon to surfaces, or the application of the
crayon to a surface that was then transferred to another surface.
 |
| Sandpaper Transfer |
A technique that
has been around for some time, though new to me, was to draw images onto
sandpaper with the crayons and then heat transfer to another surface, in this
case fabric. Donna did a great piece and I think that the sandpaper image is a
keeper as well. It was interesting to note that in
some of the samples we tried before the session we found that the wax residue
in fabric crayons tended to melt into the surrounding fabric causing a ghosting
image, while the Crayola™ crayons did not.
 |
| Wax Paper and Melted Crayons |
Diane and I attempted another tried-and-true application and that was
to grate/break crayons onto folded wax paper and melt with an iron. These
created stained glass type pieces that I think will work well as the front to
cards or perhaps journal pages.
 |
| Coloured Fusible Web and Crayon Rubbing |
Jan
came up with an idea to colour the sticky side of fusible webbing with the
crayons. She then put that piece over a rubbing plate, rubbed an image onto the
fabric and then fused it to a piece of fabric. Her rubbing plates were from Scholar's Choice™ though similar ones can be
purchased from Cedar Canyon Textiles™.
Shalinder did a piece based on this method and
used punchinella to create some additional surface texture to her piece. The
fabric she used had raised metallic motifs which added a lot to the overall
effect.
This technique left the fabric with a nice hand which will make it
great to use as a base for additional hand work, beading, embroidery etc.
 |
| Metallic Motif, Crayon Rubbing, Punchinella Design |
 |
| Melted Wax and Mono-prints |
Karen used her
heat gun to melt crayons directly to some canvas and then pulled crayon
mono-prints from the melted wax.
I think that there will be more exploration of this technique by all
of us.
 |
| Melting wax in a protective box. |
Debbie utilized a
box to melt broken crayons to a canvas and then stamped into the wax with a
large red rubber stamp. Just a side note - if you are grating or breaking
crayons to melt use a box to contain the bits as they are easily blown all over
the place with your heat tool. (You can ask my sister if you don’t
believe me.)
If you are interested in a fun craft to do with your kids (or adults) Crayola™ now has a new set of crayons called Crayola Meltdown Art Set™. Adult supervision required.
If you are interested in a fun craft to do with your kids (or adults) Crayola™ now has a new set of crayons called Crayola Meltdown Art Set™. Adult supervision required.
 |
| Sandpaper transfer and Tsukineko™ Fabric Inks |
We didn’t
reinvent the wheel, but we had a great time colouring it!
Until next time...Meredith and Jan
Tuesday, 14 October 2014
FOG Tuesday Collage Exercise
As usual our day started with our collage exercise using supplies on hand and creating a small collage in 30 minutes.
This month the Design Principle was Rhythm and Movement.
Use
of this principle allows the viewers eye to move around your piece.
This month the Design Principle was Rhythm and Movement.
 |
| Warm Up Collages Design Principle - Rhythm and Movement |
For
example, the colours of a piece can
convey rhythm by making your eyes travel from one coloured
component to another.
Lines can produce rhythm by implying movement. For
example lines may be wavy, rippled or straight.
When
elements are repeated, or arranged in a pattern, rhythm and movement is created in the art piece.
Sunday, 21 September 2014
FOG Tuesday – Silk and Wool Paper
FOG started the new season with
a foray into paper made from a variety of fibres including silk and wool
roving, silk cocoons, fire star and silk hankies. In addition we added moss,
Angelina™ fibres, thread waste and anything else we could think of.
While there are many methods out there to make silk paper, we chose a simplified version which required hot boiled water, a container, netting or J Cloth™, a watered down medium and a bit of elbow grease. We used a variety of mediums including acrylic gel, semi gloss and matte, Jo Sonja’s™ textile medium and good old fashioned Stiffy™.
While your kettle is boiling,
lay down a piece of netting or J Cloth™ in your container and start laying on a
layer of silk or wool fibres, carefully pulling from your roving a thin, wispy
pieces. Once you have one layer, add some inclusions (if desired) and lay on
another layer in a different direction. (This is very similar to the steps you
would take if you are wet felting).
While there are many methods out there to make silk paper, we chose a simplified version which required hot boiled water, a container, netting or J Cloth™, a watered down medium and a bit of elbow grease. We used a variety of mediums including acrylic gel, semi gloss and matte, Jo Sonja’s™ textile medium and good old fashioned Stiffy™.
 |
| The process begins. |
Once you have made your layer,
place the other piece of netting or J Cloth™ on top and carefully add your
boiling water with a spoon or sprayer.
(Pouring directly from the kettle may move your layers around, so use a light hand.)
(Pouring directly from the kettle may move your layers around, so use a light hand.)
 |
| This cat litter tray was perfect for the project. |
Dip your roll into a 5 parts water/1 part medium, squishing it several times until saturated and then squeeze out as much as possible. Remove the top layer of netting or J Cloth™ to reveal your sheet of paper.
At this point, you can fold over the edges to create straight or firmer edges. Cover with netting (J Cloth™) again, roll up and re-dip into the medium mixture. Remove the layers of netting (J cloth™).
We are very lucky in Calgary to have Legacy Studios quite near to us to purchase many of the fibre related supplies that we used in these projects.
Lay to dry and then use as you
please. These pieces can be run through a printer, hand or machine embellished
with stitching or beading, cut into pieces for use in other projects or used as
pages of a journal.
 |
| Several of Jan's pieces. Left: Merino Silk, commercial stencils, spray inks. Centre: Very thin piece of merino/silk blend paper, coloured with coffee, mounted on freezer paper and run through an HP printer. Right: Hand dyed silk tops. |
 |
Left: Silk paper with moss inclusion. Donna Centre: Silk hankies with silk fibre inclusion. Meredith Right: Silk cocoons. Chris |
FOG Tuesday Collage Exercise
This month’s collage exercise was based on the Design Principle – Unity and Variety.
It’s interesting the further we delve into Elements and Principles of
Design that they all start to meld together. How cool is that?
 |
| Warm Up Collages Design Principle - Unity and Variety |
Unity creates harmony by using similar elements within the composition
and placing them in a way that brings them together. For example, using all
circles (unity), but varying the size (variety). Other examples to suggest
unity would be the use of repeated colours, textures or patterns.
Variety adds interest by using additional elements within the composition. For
example, varying the colour of the circles (variety) but keeping all the
circles the same size (unity). Too much variety of elements may result in a
busy composition.
The key to a great composition
is to find just the right balance in your work using both unity and variety
to their best advantage.
Wednesday, 20 August 2014
Serendipitous Opportunities For Creativity
Recently on our evening news there was a short story about a
local charitable organization called Art
à la Carte which has been operating in Calgary for 20 years. Their mandate
is to “bring art, conversation, and joy to long-term patients by transforming
sterile hospital rooms and treatment areas into places of greater comfort and
hope.” (From the Art à la Carte website.)
A very few short days later we were contacted by one of
their coordinators asking if the Fibre Optics Group would be interested in providing some backless
hospital gowns to be used as table décor for their annual fundraising event in
September. It was a serendipitous moment that had to be acted upon.
I suppose that I must have made clothes for my dolls growing
up but it was my mom who provided my sisters and me with wonderful hand knit
sweaters and hand sewn clothes for our dolls. Later in her life she rescued,
cleaned, repaired and clothed dolls each year to donate to the Kelowna
Firemen’s charity to be given to children at Christmas.
 |
| Hospital Couture |
Making the hospital gowns for the Gowns without Bounds
event in September was a neat way to remember that significant detail about my
mom and her life.
Jan and I tied the last bow today and they are ready for
delivery.
Visit Art à la Carte’s website to learn
more about their programs, how you can donate or volunteer.
Monday, 21 July 2014
“Must have” gadgets for the fibre artist in your life
Just before Christmas I did a blog posting about two neat
tools for mixed media projects and promised that I would do a subsequent post
on my favourite tools for fibre related projects. While I don’t fancy myself as
a gadget kind of gal I do have a few
“must have” gadgets on my Chatelaine
that are very useful for quilting, surface design and fibre related projects.
What is a Chatelaine
you ask? Historically it was a grouping of small items that a housekeeper or
lady of the house (a chatelaine) would have attached at her waist or neck with
keys, scissors, hanky or other items useful to her every day needs. Over the years these have morphed into use as
a sewing tool complete with scissors, needle cases etc. Some were made of
silver and very elaborate, some quite plain as mine strung on a piece of
soutache cord, but never the less just as useful. Google Sewing Chatelaine images and you’ll see quite a variety of them. On
a similar note, a Housewife or Hussif were small sewing kits often
carried by soldiers in the field to mend their uniforms or sew on loose
buttons.
 |
| Sliver Gripper Tweezer™ |
The first “must have” comes from my favourite Canadian store
Lee Valley Tools. The tool is the Sliver
Gripper Tweezer™ that comes with its own handy clip so that it can be
attached to your Chatelaine.
They are invaluable to those who paper piece to
get rid of those tiny pieces of paper that just won’t give way; for taking out
teeny tiny machine quilting stitches; and if you were my dad, removing slivers.
These are modestly priced, well made, and from the US.
 |
| Gingher Snips™ |
My second “must have” are my Gingher Snips™, well worth what I paid for them many years ago
($8), but are still worth the price at $12 - $27 depending on where you live or
if you have a coupon. Just 4” long,
sharp and light weight; they have a loop on the top so that they can be strung
onto your Chatelaine. I also like that they have no thumb hole and are easy to
pull out and return to their topper with one hand.
 |
| LoRan Needle Theader™ |
Lastly is the LoRan
Needle Theader™ by Dritz. This
threader is much more robust than those with the tiny piece of wire that always
pulls out with one good tug. It is not useful for small eyed needles, but great
for threading embroidery floss/perle cottons onto a larger eyed needle for hand
stitching. Once again, this handy tool can be strung onto your Chatelaine for
easy access. These are reasonably priced at about $2.
There is no affiliation to any of these companies – I’m just
pleased to share with you the tools of
the trade that I find very useful.
What’s your favourite sewing tool of all
time for quilting, hand stitching, surface design or fibre arts and why?
Thursday, 17 July 2014
The Lost Art of Ribbon Work
 |
| Project and close up shots of leaves, bud and flower. |
Jan and I just completed the spring session with the Calgary Public Library and presented “The Lost Art of Ribbon Work”. Each
participant received a kit, complete with wired ribbon, linen backing and a
frame and learned to stitch a simple boat leaf and Jewel Weed flower and put it
all together in the frame.
Ribbon flowers have been around for a long time and along
with other artistic pursuits, was a skill learned by young women. In France, one centre of fashion, women could
earn a living making these flowers, leaves, rosettes and other ribbon trims
sold to design houses and women to embellish hats, gloves, lingerie and
headbands.
The 1920’s saw quite a resurgence of the use of these types of
decorations.
 |
| Republished by Dover Publications in 1986. |
Along with this came an interest in The Language of Flowers, where each flower or colour of flower had
a particular meaning related to love, death, sorrow or happiness.
We showcased a sample board of other flowers and leaves, which
surprisingly are very easy to make, many only requiring a few inches of ribbon
and a few stitches to shape and hold them together. The Calgary Public Library has many books in their collection and videos
and on line tutorials for making ribbon flowers abound on the internet.
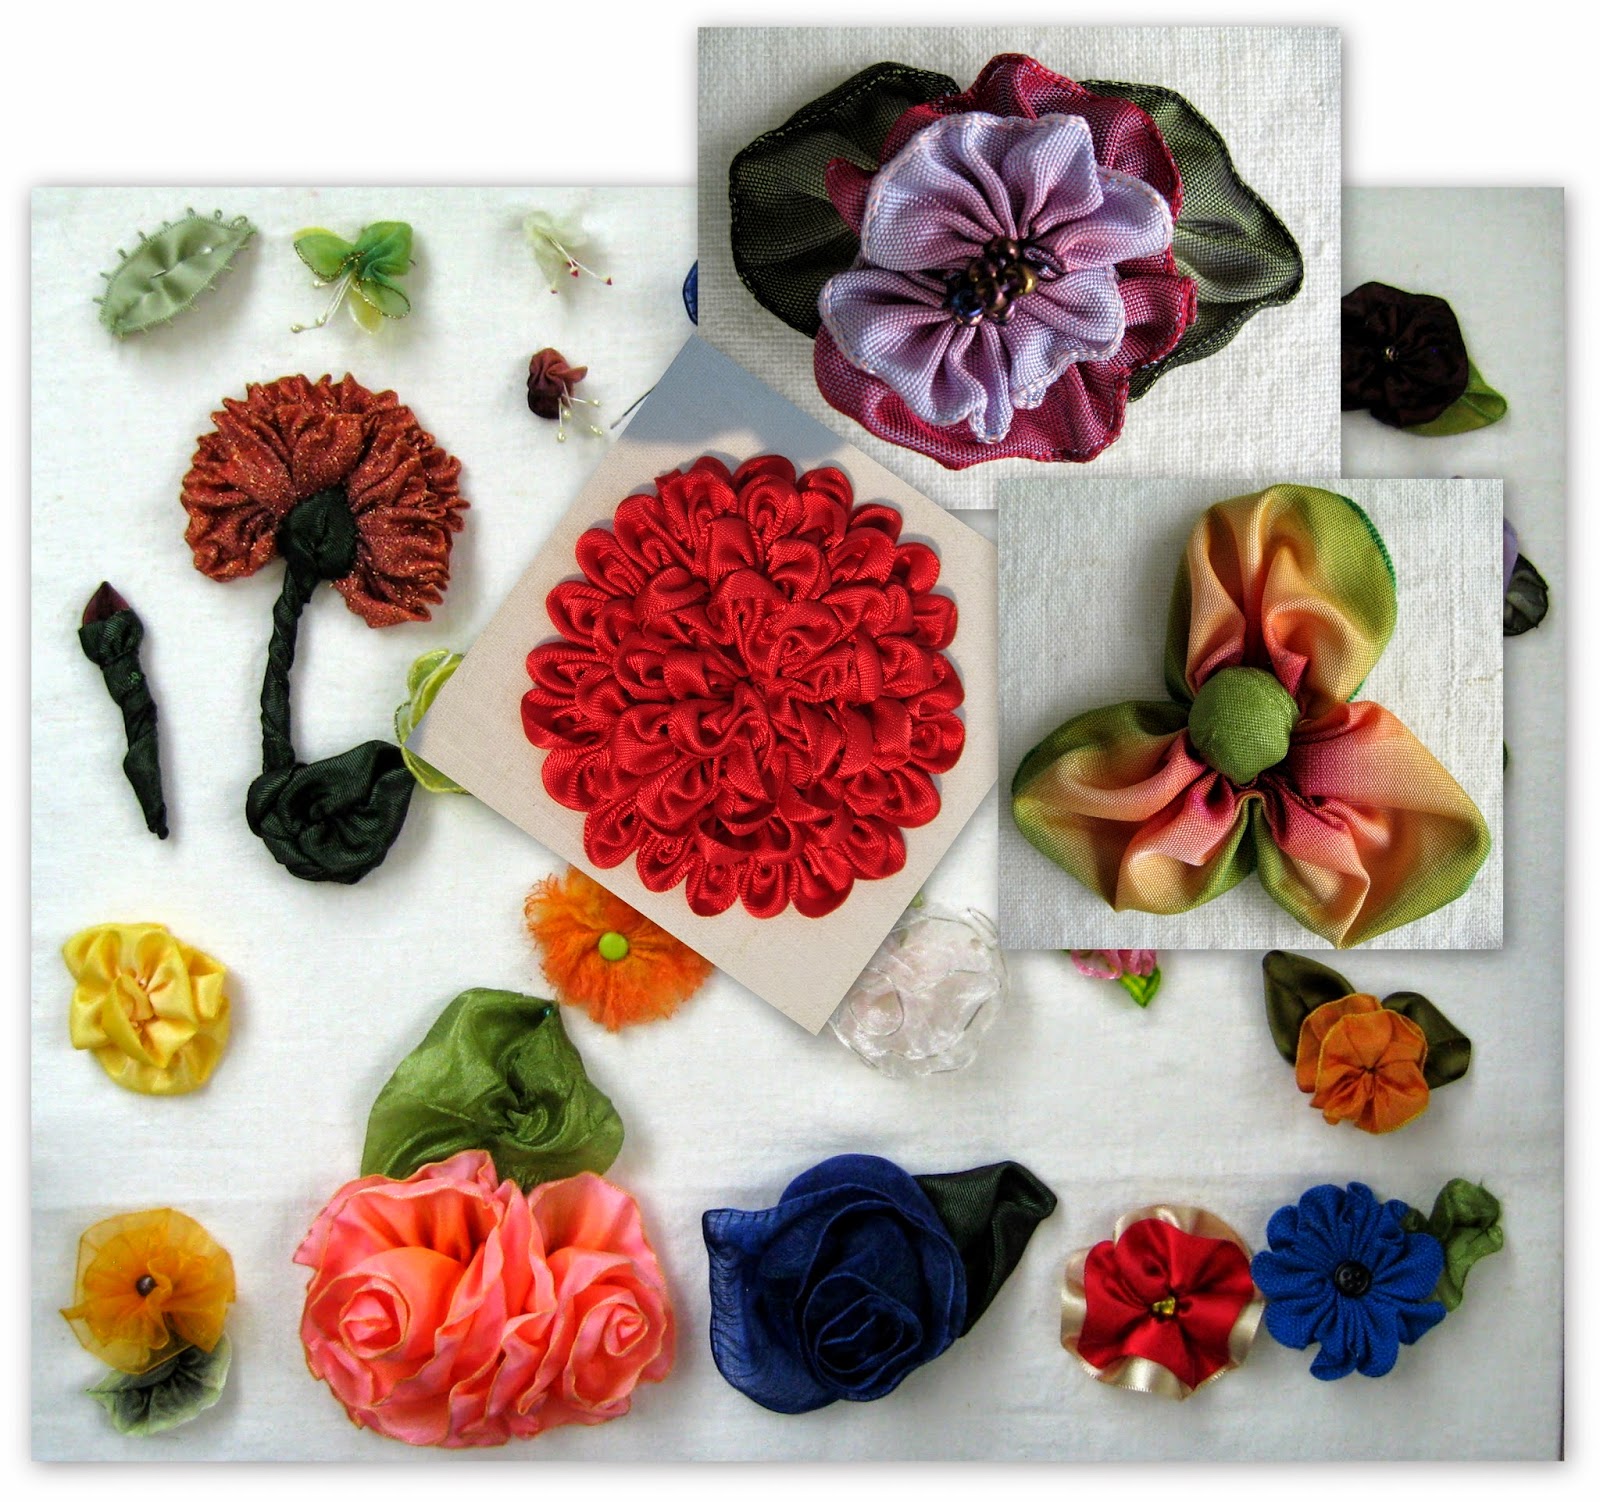 |
| Sample board of ribbon leaves and flowers. |
We will be teaching again with the Calgary Public Library
this fall, presenting two new projects at 13 libraries throughout the city.
Registration
for these sessions will begin towards the end of August so watch for the new program
guide. We hope to see you there. Jan and Meredith
Subscribe to:
Posts (Atom)