Well, it's April 1 and time to announce the winner of our first "Thrill of the Hunt" giveaway in March.
We had a friend look at the three entries and she chose Phyllis for the variety of uses from her thrifty purchase of a bag of buttons. Phyllis, please send us your snail mail address and we'll put the non stick craft mat into the mail to you.
Thanks for participating and watch for another giveaway soon...
Monday, 1 April 2013
Sunday, 17 March 2013
The Wonders of Felt
I’m not certain when or who began making felt into yardage
or squares, but it seems to be a craft item that has never gone out of style.
Every church bazaar from the 50’s and 60’s had a variety of items made from
felt. I’ve been going through a pile of Better Homes and Gardens
magazines from that era and there are many items made from felt within their
pages. I know that I’ll be dating myself when I say that I still have my first
Christmas stocking, over a half-century old, hand crafted from wool felt and won by my mom at a
church bazaar. And who doesn’t remember the felt boards at school with
all the felt shapes and letters? (OK if you are a 30 something or younger you may not remember).
Felt is a very inexpensive and forgiving product to work
with. It doesn’t ravel and can easily be cut and sewn by hand. If you have
pinking shears you can cut decorative edges and it can be glued to join pieces
together. If you have one of the cutting systems that are now available
(Sizzix, Spellbinders etc.) that come with shaped cutting dies, you can also die cut felt shapes for your crafting projects.
In response to a blog reader question about the dry needle
felted flowers in the previous posting, I felt (no pun intended) that making multiple flowers from commercial felt would be a better way to go. I tried out a few of the
many styles of flowers made from this humble crafting item. Here are my
results.
 What turned out to be my favourite one is the Scalloped
Spiral.
What turned out to be my favourite one is the Scalloped
Spiral.
In the photos I used a 5” square of commercial acrylic felt.
- Fold your square into quarters and trim to a circle shape.
- Cut a very loose spiral from the circle, starting narrow and ending wider towards the middle. Don’t make too many rounds.
- Cut a scalloped edge on one side as shown.
- Starting with the narrow end line up the non scalloped edge and wind the cut spiral around the centre core. Continue until the entire spiral, except the very inner circle, is wound.
- Place a dab of hot glue at the final round to secure.
- Glue the flat bottom of the flower and use the remaining felt to cover the base.
 Variations of the Spiral Flower can be made with larger or
smaller circles, using pinking shears to cut the spiral or leave the edges
unscalloped, as in the two cream coloured blooms with the green felt leaves.
Variations of the Spiral Flower can be made with larger or
smaller circles, using pinking shears to cut the spiral or leave the edges
unscalloped, as in the two cream coloured blooms with the green felt leaves.
Directions for the other style of flower I tested may be found at
this site.
Friday, 15 March 2013
Because we FELT like it :)
 Tuesday was FOG day and Jill, our talented needle-felting
member, first gave us a demo of the types of wool, yarns, tools and tricks of
the trade used in needle felting. Jill normally works in 3D so started us off
with making a ball that turned into a rather frightening little monster. I can
see that these would be a favourite with kids.
Tuesday was FOG day and Jill, our talented needle-felting
member, first gave us a demo of the types of wool, yarns, tools and tricks of
the trade used in needle felting. Jill normally works in 3D so started us off
with making a ball that turned into a rather frightening little monster. I can
see that these would be a favourite with kids.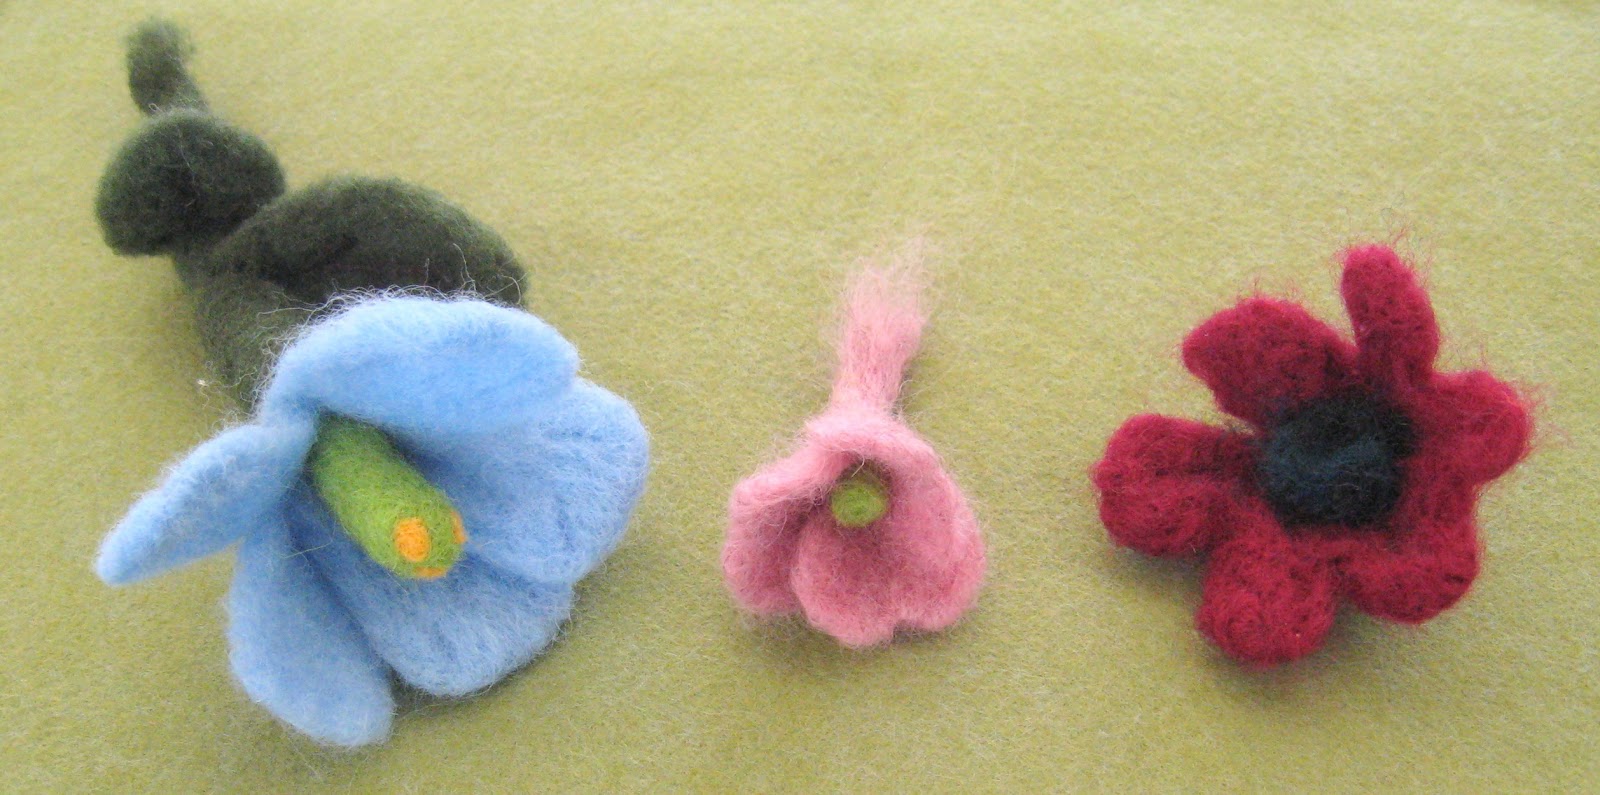 As we would not likely use these monsters in a fibre arts
piece, we also tried our hand at making a 3D flower.
As we would not likely use these monsters in a fibre arts
piece, we also tried our hand at making a 3D flower.
We spent the rest of the time experimenting with needle
felting a variety of fabrics and fibres into other background fabrics. Diane
was most creative with her butterfly. She had been making a pair of socks and
didn’t like the toe so cut it off and needle felted into some wool fabric.

We enjoyed the day so much and could certainly see the
potential for our fibre arts projects so we have decided to take a trip to the
Carstairs Woolen Mills to buy more wool roving and dedicate part of our April
FOG day to working with this medium again. It might be advised to update your tetanus shot as the potential for sticking yourself with the felting needles is quite high. Ask us how we know!
Wednesday, 6 March 2013
The Thrill of the Hunt
I don’t know about the rest of you, but
grocery shopping became less interesting to me when they started to use
barcodes instead of price stickers. No longer could I scrounge around on the bottom shelf for the jar
of peanut butter that was priced less than the ones at eye level.
 I still enjoy “the thrill of the hunt” and
starting today, Jan, my cohort in all things “cheap and cheerful” (to quote the
Brits) and I will be sharing with our blog followers some of the escapades that
we go on in search of interesting and frugal fibre arts and mixed media arts
and craft supplies and where they may be found in Calgary and area.
I still enjoy “the thrill of the hunt” and
starting today, Jan, my cohort in all things “cheap and cheerful” (to quote the
Brits) and I will be sharing with our blog followers some of the escapades that
we go on in search of interesting and frugal fibre arts and mixed media arts
and craft supplies and where they may be found in Calgary and area.
With today’s frugal find we are also doing
our first giveaway, a non-stick silicone baking sheet, a $2 find that is virtually identical to the non-stick craft mats sold by a number of companies for $15 -
$25 dollars.
Our $2 find is a tad smaller than the others, but works just as
well as the more expensive brands. This frugal find was purchased in Calgary at
Bianca Amour Liquidation.
In order to win today’s giveaway,
post your
favourite "crafty" frugal find in the comments area. We will have a third party pick
the winning entry on April
1st and contact the winner for their mailing
address. Cheers, Jan and Meredith
Sunday, 24 February 2013
Image Transfer Techniques
 February
FOG day was devoted to working on a "Valentine's" themed project,
using something that was heat embossed with embossing powders. We worked on
these in the morning and in the afternoon we experimented with just a few of
the myriad of image transfer techniques.
February
FOG day was devoted to working on a "Valentine's" themed project,
using something that was heat embossed with embossing powders. We worked on
these in the morning and in the afternoon we experimented with just a few of
the myriad of image transfer techniques.
One of these is the packing tape/clear contact paper
transfer, a simple, easy and inexpensive transfer method. Find an image in a
magazine that you want to transfer and cover the right side of the image with a
piece of the packing tape, sticky side down on the image.
Next, soak for a short time in a bowl of water. Once it is wet begin in the centre and with your thumbs or fingers start rolling the magazine paper from the back of the tape until only the image is left. The really interesting thing about this type of transfer is that there is no white colour applied to a magazine page, so when you remove the paper, you are left with clear tape.

Two other methods that we tried were:
Artist Transfer Paper by Lesley Riley
Friday, 25 January 2013
Micro Bead Bird Embellishment
On one of my last pieces for FOG, I created a
beaded bird. If you look at the photo, you will see that the bird is outlined
in black and that micro beads fill in the areas between. The black outline of
the bird is actually a sticker that I picked up at a scrap booking store.
Although there are many of these types of stickers, some in black and some in
white, the one I used came from a sheet of birds (see photo), and was designed
by Elizabeth Craft Designs (#2350). This bird sticker is approximately 2” long
by 1 1/2” wide. Although this is a sticker, I felt that it would need a little
extra glue to keep it in place, so I used gel medium to adhere it to my
background. By the way, my background is a piece of felt covered with painted
fusible web, stitched, and distressed with a heat gun.
 After the glue had dried, I then put gel medium
onto one section of the bird at a time and poured micro beads onto it. This
process was repeated for each section. Sometimes I found that I had to redo
parts of a section, or pick beads off the black outline as these sections are
very tiny and my accuracy with my toothpick wasn’t always perfect.
After the glue had dried, I then put gel medium
onto one section of the bird at a time and poured micro beads onto it. This
process was repeated for each section. Sometimes I found that I had to redo
parts of a section, or pick beads off the black outline as these sections are
very tiny and my accuracy with my toothpick wasn’t always perfect.

Anyway, after a number of days, the bird was
complete. I was very pleased with the outcome and that my fellow mixed media
artists at FOG were impressed. Jan S.
Wednesday, 16 January 2013
January FOG Session and Embossing
At our FOG session in January we worked on encompassing our December Fun Foam embellishment into our journal page. Diane came with hers already embedded into her journal cover, so she was ahead of the rest of us. Finished projects will be posted at a later date.
Our afternoon technique was working with rubber stamps and embossing powders. If it laid flat and could be stamped, it was embossed. It worked very well on most things; fabric, hand made papers and card stock, balsa wood business cards from Lee Valley Tools, metals and mica.
One of the neatest things we discovered was making a non metal substrate look like metal. First off stamp your rubber stamp in the VersaMark ink pad and set aside. To achieve this great metallic look on non metal surfaces first coat the surface with a clear VersaMark ink pad then liberally coat with a metallic coloured embossing powder (silver, gold, copper), tap off the excess powder and heat with a heat gun. Repeat this 3 - 4 times to lay down a thick layer of the embossing powders. As soon as you have completed the final layer of the embossing powder and before it cools, quickly stamp your rubber stamp into the surface. Just a note, do not reheat after it has been stamped or you will lose the imprint. Askme how I know :)
I think it was safe to say that we had a great time with the embossing powders and the possibilities for use in our mixed media projects.
Our afternoon technique was working with rubber stamps and embossing powders. If it laid flat and could be stamped, it was embossed. It worked very well on most things; fabric, hand made papers and card stock, balsa wood business cards from Lee Valley Tools, metals and mica.
One of the neatest things we discovered was making a non metal substrate look like metal. First off stamp your rubber stamp in the VersaMark ink pad and set aside. To achieve this great metallic look on non metal surfaces first coat the surface with a clear VersaMark ink pad then liberally coat with a metallic coloured embossing powder (silver, gold, copper), tap off the excess powder and heat with a heat gun. Repeat this 3 - 4 times to lay down a thick layer of the embossing powders. As soon as you have completed the final layer of the embossing powder and before it cools, quickly stamp your rubber stamp into the surface. Just a note, do not reheat after it has been stamped or you will lose the imprint. Askme how I know :)
 |
| Top Left: Embossing on Mica, Top Right: Embossing on Hand Made Papers, Middle: Metallic Look on Card Stock; Bottom Left: Embossing on Lee Valley Balsa Business Cards, Bottom Right: Embossing on Painted Card Stock that has also been Dry Embossed in a Sizzix. |
Subscribe to:
Posts (Atom)