Showing posts with label Sizzix. Show all posts

Monday, 23 May 2016

FOG Tuesday - We All Felt It!

We have worked with commercial felt in past sessions, but in our session in May we focused entirely on commercial felt squares and the multitude of ways it could be manipulated, embellished, stitched and most importantly, how it distressed/melted with our heat guns.

Felt comes in a variety of colours and also as printed or embossed felt. The printed felt is quite fun to use and adds an element of extra colour to the piece. We did not try embossed felt, but it is available at Michael’s here in Canada. If you are a little more on the diva side, felt also comes flocked and glittered.

Printed felt, left. Hand cut petals of printed felt,
heat distressed and assembled with a brad.
Add a pin backing and you have a great brooch to wear.
Printed felt, stitched and heat distressed.
One of the ways we altered the look of the felt before stitching and melting was with the use of commercial and handcrafted stencils and stamps.
Jan, commercial stencil, left. Printed with metallic
paint, right.
Gillian, several techniques on all pieces.
Variations on a theme, Commercial flower stencil.
Couched yarns.

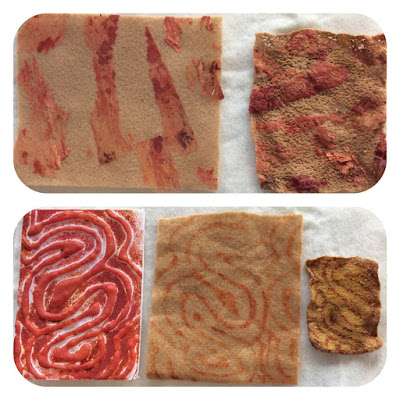
Top, felt with added painted fusible web pieces, left, 
and heat distressed, right.
Bottom, hand crafted stamp, glue gun glue on a
piece of foam core, left, printed felt, middle and heat
distressed, right.

Glue gun glue on foam core, left, stamp cut from a
shoe insole, top right. Bottom right, stamp made
from commercial, sticky backed foam stickers.
If you want to maintain some structure with your piece before melting, you can stitch on the felt beforehand. This ensures that your piece will not fall apart. We tried both cotton and polyester threads and both seemed to work.

Diane, Stitched and distressed.
Nan, Stitched and distressed.
If you own, or have access to a Sizzix™ or similar die cutting machine you can cut shapes with your Sizzix™ and then heat distress them with your heat gun. Both craft embossing and industrial heat guns work well, you just need to test beforehand how much heat you need to use to melt your felt.

Leaves cut with a Sizzix die and then heat distressed.
Many synthetic fabrics will distress/melt with a heat gun. While we mostly focused on the poly felt, by Kunin™ and Creatology™.  Both are widely available at Michael’s and most of the dollar stores. Karen did try some polar fleece and it seemed to work very well.
Karen, adding elements to a denim piece, left.
Heat distressed polar fleece, right.
Another way to embellish your piece is to print an image onto fusible web and then iron it onto your felt. Then you can be as creative as you want with stitching and heat distressing.
Chris, Image on fusible web transferred by ironing to the felt, left.
Stitched and heat distressed, right.
While we were using the 9” by 12” inch squares of felt, I guess they really should be called rectangles J, felt is also availed in larger precut pieces and by the yard/metre off the bolt at your local fabric store. Just think of the possibilities with a very large piece of felt.

ECO Alesrt! You should also feel good about using felt as a crafting item as it is mostly made from 100% post- consumer recycled and BPA-free plastic bottles and produces a high-quality fibre at a very modest price.

Until next time, have Fun with Felt. Meredith and Jan
Thursday, 26 February 2015

FOG Tuesday - Air Dry Clay

You may not have discovered this, but we found that not all air dry clays are created equal! Unfortunately, we were not able to try all types. 

We purchased two air dry clays — the Crayolabrand and one from Dollarama here in Canada.

 Crayola Air Dry Clay

Overall I’m sure we would all agree that the Crayola™ brand was the better of the two commercial products. We tried the white version, but it also comes in terra cotta as well as a 3-pack of smaller tubs in coral, sunglow and emerald. It seemed more robust when dry and dried flatter than the Dollarama clay.

Dollarama Air Dry Clay

I felt that the Dollarama clay, when rolled too thin, warped when dry and was likely to break off along lines of design.

Both can be coloured with acrylic or Lumiere paints and highlighted with pearlescent powders or metallic rubs. It may be beneficial to seal the items with gesso before applying paint to the surface, particularly the Dollarama clay which, though touted to dry white, actually dried a light grey. 
Various techniques and finishes.
Both were quite easy to roll and form and could be reworked as required. Both took impressions made by Sizzix™ or Cuttlebug™ embossing folders, mould flexible mats, rubber stamps and other mark making tools.

Dollarama Air Dry Clay
Dollarama Air Dry Clay 


Although we put holes into many of the pieces so that we had a way to adhere them to other
projects, I’m not too sure how well they will stand up to that use, especially larger pieces. Their use as buttons and smaller items to sew or glue onto cards and fibre projects is likely a better use of these air dry clay pieces. One does need to remember that these would not be suitable for washed items as the clay would break down.

Leslie making buttons.
Vintage look plaque.
Two FOG regulars “cooked” up different home versions of air dry clay and we’ll have a better idea of their properties once the pieces are brought back for show and tell.

Karen's home made air dry clay.

Just a funny side note – if your diet is of any concern to you, then you might want to try the grey clay from Dollarama as it was labeled as being “Gluten Free”! Sheesh – do we really need to be told that or are there way more pica kids out there than originally thought?

Until next time…

Tuesday, 22 October 2013

Bodacious Blooms

You may remember the posting on making felt flowers a while back. While I was making those flowers an idea "blossomed" (pun intended) and I suggested to Jan that we should do a joint project for the show on October 20. Now that the show is over we can finally unveil our arrangement.

It started by making a wet felted vessel for the vase and then finding a source for the non woven paper. We incorporated leaves and flowers made from commercial poly felt and the non woven papers. Both fibres can be easily cut with scissors or using Sizzix dies, can be stitched by hand or machine and heat distressed with our trusty heat guns.  The final touch was the hot pink wire spirals.

"Bodacious Blooms"
Meredith Helgeson and Jan Scruggs


Needless to say we had lots of fun over the summer with this project and the day before launch day decided against trying to calculate how many hours we had put into it. Feedback on it was great at the exhibition and we even got the green thumbs up from floral arranger guru Arlee Barr (thanks Arlee!)

Sunday, 17 March 2013

The Wonders of Felt


I’m not certain when or who began making felt into yardage or squares, but it seems to be a craft item that has never gone out of style. Every church bazaar from the 50’s and 60’s had a variety of items made from felt. I’ve been going through a pile of Better Homes and Gardens magazines from that era and there are many items made from felt within their pages. I know that I’ll be dating myself when I say that I still have my first Christmas stocking, over a half-century old, hand crafted from wool felt and won by my mom at a church bazaar. And who doesn’t remember  the felt boards at school with all the felt shapes and letters? (OK if you are a 30 something or younger you may not remember).

Felt is a very inexpensive and forgiving product to work with. It doesn’t ravel and can easily be cut and sewn by hand. If you have pinking shears you can cut decorative edges and it can be glued to join pieces together. If you have one of the cutting systems that are now available (Sizzix, Spellbinders etc.) that come with shaped cutting dies, you can also die cut felt shapes for your crafting projects.

In response to a blog reader question about the dry needle felted flowers in the previous posting, I felt (no pun intended) that making multiple flowers from commercial felt would be a better way to go. I tried out a few of the many styles of flowers made from this humble crafting item. Here are my results.

What turned out to be my favourite one is the Scalloped Spiral.
In the photos I used a 5” square of commercial acrylic felt.
  • Fold your square into quarters and trim to a circle shape.
  • Cut a very loose spiral from the circle, starting narrow and ending wider towards the middle. Don’t make too many rounds.
  • Cut a scalloped edge on one side as shown.
  • Starting with the narrow end line up the non scalloped edge and wind the cut spiral around the centre core. Continue until the entire spiral, except the very inner circle, is wound.
  • Place a dab of hot glue at the final round to secure.
  • Glue the flat bottom of the flower and use the remaining felt to cover the base.

 Variations of the Spiral Flower can be made with larger or smaller circles, using pinking shears to cut the spiral or leave the edges unscalloped, as in the two cream coloured blooms with the green felt leaves.
 

Directions for the other style of flower I tested may be found at this site.

Wednesday, 16 January 2013

January FOG Session and Embossing

At our FOG session in January we worked on encompassing our December Fun Foam embellishment into our journal page. Diane came with hers already embedded into her journal cover, so she was ahead of the rest of us.  Finished projects will be posted at a later date.

Our afternoon technique was working with rubber stamps and embossing powders. If it laid flat and could be stamped, it was embossed. It worked very well on most things; fabric, hand made papers and card stock, balsa wood business cards from Lee Valley Tools, metals and mica.

One of the neatest things we discovered was making a non metal substrate look like metal. First off stamp your rubber stamp in the VersaMark ink pad and set aside. To achieve this great metallic look on non metal surfaces first coat the surface with a clear VersaMark ink pad then liberally coat with a metallic coloured embossing powder (silver, gold, copper), tap off the excess powder and heat with a heat gun. Repeat this 3 - 4 times to lay down a thick layer of the embossing powders. As soon as you have completed the final layer of the embossing powder and before it cools, quickly stamp your rubber stamp into the surface. Just a note, do not reheat after it has been stamped or you will lose the imprint. Askme how I know :)
Top Left: Embossing on Mica, Top Right: Embossing on Hand Made Papers, Middle: Metallic Look on Card Stock; Bottom Left: Embossing on Lee Valley Balsa Business Cards, Bottom Right: Embossing on Painted Card Stock that has also been Dry Embossed in a Sizzix.
I think it was safe to say that we had a great time with the embossing powders and the possibilities for use in our mixed media projects.

Saturday, 22 December 2012

Paper Cloth & Foam Embellishments

Our December FOG session was a stimulating one. We were working with our paper cloth, or fabric paper (whichever term you like) from Diane’s demo at our November session, and using it as the background of our art piece. Pat came with hers virtually completed, but the rest of us were still busy working by lunch break. 
Completed Paper Cloth/Fabric Paper Samples
We spent the afternoon making Fun/Craft Foam embellishments. Yes, even though that sounds rather hokey, they really do turn out great. In a nutshell, you heat up your Fun/Craft Foam with a heat gun, press a rubber stamp into it until it cools and voilĂ , you have an embellishment ready for painting, inking, or colouring by other means. The harder red rubber stamps with simple, deeply etched designs seem to work the best.

We discovered that we could heat the foam sheets and run it through the dry embossing machine (Sizzix) to impress the image. This opens up a plethora of possibilities for designs. We also cut some shapes out of the foam, folded over the top (around a knitting needle), carefully heated the foam and impressed it. This makes a rather nice pendant, especially painted with the Lumiere paints.
Fun with Fun Foam
 We also discovered that not all Fun/Craft Foam is created equal. The thicker the Fun/Craft Foam, the better the impression of the stamp, or embosser. We were really churning them out and didn't get a lot of time to paint, ink or colour them. (Lumiere paint by Jacquard is the best for some metallic or pearlescent colour).
January Challenge
In fact, we were so enamoured with our efforts that we have decided to use the woman’s face for our January challenge, the start of an ongoing art journal project. Can’t wait!