Showing posts with label Calgary Public Library. Show all posts

Sunday, 4 October 2015

Alberta Culture Days

Jan and I were asked again this year by the Calgary Public Library to participate in Alberta Culture Days here in Calgary and we presented "We're On Pins and Needles" to full classes at two libraries in the city.

We had the participants make a pin cushion using a mason jar and used two different techniques to embellish them.

The first was embossing on velvet, a technique used from early days to embellish the inside of an embossed leather frame photo case holding a tin type photo. These were certainly in use since the days of the American Civil War and would have been carried by soldiers and others to remember their loved ones.

This technique would have used a metal roller to emboss the velvet. We are using a modern day version, using a red rubber stamp.

Rayon acetate is the best velvet to use, however, this technique also works on cotton velveteen. Try other types of velvet as well and a good source of good velvet are clothing items found at thrift shops.

Tin type of my grandfather and great grandmother Hatchell, circa 1884.

The second technique that we used was embroidery in a colour that would enhance and not compete with the embossed velvet. We used french knots and stars.

Supplies:
·         6” square of Velvet, rayon/acetate is great to use, but is hard to find. You can also use cotton velveteen with decent results, depending on your rubber stamps
·         Rubber stamps, clean images with good lines
·         Spray bottle with water
·         Iron
·         Wide mouth mason jar with ring and snap lid (250 ml)
·         Glue or glue gun to add the circle of felt onto the bottom side of the ring to finish it off.
·         Stuffing - polyester fibre fill
·         Matching embroidery thread, you want to add texture with your embroidery, not take away from the embossed image.
·         We used # 12 perle cotton. 4" or 5” embroidery hoop.
·         Strong thread to gather velvet..

Directions:
1.   Fold your square of velvet in half both ways and pinch to determine the centre of the square. Mark with a pin, if desired.
2.   Select your stamp of choice, placing it right side up on the ironing mat. Lightly spray with water. Place your square of fabric, plush side down and centered on your rubber stamp and lightly spray with water. Remove pin, if used
3.   Carefully place the iron on top of the stamp and velvet and press hard for about 10 seconds. Do not move the iron. Lift the iron to see that you can see the impression of the rubber stamp on the back side of the velvet. If it looks good then remove the velvet. If not, press again for a few seconds.
4.   Place embossed velvet into the embroidery hoop. Do a random combination of French Knots and Stars around the embossed image. 
5.   Rough cut your velvet square into a circle, by trimming the corners. Do not remove a lot of fabric, as it is necessary to have enough to cover the edges of the lid by at least a 1/2” all around, after the stuffing is inserted.
6.   Thread a needle with a doubled, strong thread and do a gathering stitch around the circle about 1/4” away from the edge.
7.   Gather up the velvet to make a pouch and place your stuffing into the velvet trying to make a nice round shape.
8.  Place the metal lid into the velvet, with the printed top of the lid next to the stuffing, and gather up tightly, adjusting as necessary. Your fabric will cover 1/2” to 1" of the bottom of the lid all around. Knot and cut your thread.
9.  Place the outer ring over the gathered piece. Make any adjustments necessary to centre your embossed motif.
10. Cut a circle of felt slightly smaller than the lid and glue/glue gun to the back of the gathered velvet and exposed lid.

Steps 1 - 3

Steps 4

Steps 5 - 10
Finish off with a pair of folding scissors, pins, needles and thread and you have a great gift for that sewing fanatic in your life. After all Christmas is coming....


Tuesday, 25 November 2014

Calgary Public Library Sharpie Marker Dyeing Project

This past Saturday was the last of 7 sessions for the Calgary Public Library using Sharpie Markers™ and rubbing alcohol to create a lot of interesting patterns. Our original project, a cotton scarf, often morphed into just having a lot of fun making marks on the 100% cotton fabric and adding 99% alcohol with an eye dropper to see how the Sharpie pigments moved. 

Let me tell you about our 2 main supplies – we did use Sharpie™ Markers for this project, but any alcohol based marker will work. Bic Markit™, Copic™ and Spectrum Noir™ are others that you can use. Sharpies™ and the Bic Markit™ alcohol markers can often be found on sale at Staples here in Canada.

The second ingredient is rubbing alcohol, and if you read our post in June of this year you may remember that rubbing alcohol comes in three main strengths, 70%, 90% and 99%. We used the 99% for this project and used an eye dropper to drop it onto the marker ink. Rubbing alcohol (perhaps due to its therapeutic use) also has an expiry date, so it’s probably wise to buy a fresh bottle for this project. Costco here in Canada has the best price and does sell the 99%, where many pharmacies do not.

The rubbing alcohol pushes the marker pigment concentrically away from the drop location so you can experiment with where you are making your alcohol drops for different effects. If you want to repeat a motif, it’s not a bad idea to do a sample piece with your motif before and after dropping the alcohol so that you remember how you made it.

Other supplies needed are 100% cotton, an eye dropper, a table covering and a good supply of fresh air!

We also did this project at our June FOG group on silk scarves, so visit that posting if you want to know more about doing this process on silk.

Although many finished a scarf during the session, we only had the pleasure of seeing one of our participants wearing her creation as she brought the finished piece to another session. As you can see from the photo below, she folded the 54” piece of cotton in half lengthwise, sewed around it, right sides together and then turned it right side out. She then did a beaded fringe on one end only and lovely beading up the seam side. Folding it gave it a nice feel and the beaded fringe some nice weight.

Carleen's finished Scarf with beaded fringe

What follows are some awesome examples of motifs that our participants came up with.

In each pair, the motif before the alcohol was dropped is on the left,
after the alcohol was dropped is on the right

In each pair, the motif before the alcohol was dropped is on the left,
after the alcohol was dropped is on the right. In the bottom example,
the drawing was enhanced with black marker lines after the alcohol was dropped.

In each pair, the motif before the alcohol was dropped is on the left,
after the alcohol was dropped is on the right.

Other uses for the decorated cotton could be quilt blocks or small fringed pieces for the fronts of cards.

Joan's southwest sunset.

Once all the decoration is completed, let your cotton dry thoroughly overnight and then heat set with your iron set on the cotton setting. Once heat set, they are washable and the colours will not run.

Tuesday, 18 November 2014

Calgary Public Library:Meet the Maker Sessions

The Calgary Public Library is offering a number of “Meet the Makers” events over the next six weeks and Jan and I have been invited to lead two of the sessions.
These sessions are a chance for library patrons to meet us and for you to learn a new skill with these easy make-and-take projects.
No registration is required and all supplies are provided.
Our sessions are:

Wire and Bead Pendant: Monday, December 15th from 1 – 3 PM at the Central Library downtown This session has been rescheduled to Tuesday, December 16 from 11:30 AM – 1:30 PM.
Recycled Jean Journals: Monday, November 24th from 1 – 3 PM at the Central Library downtown


November 24 Central Library "Meet the Maker"
Two decorated and completed recycled jean journals.
Journals were bound using a 3-hole pamphlet binding.

We hope to see you there and we’ll be back in 2015 at the Saturday Arts Club at the Central Library with 4 new projects!
Recycled Jeans Journals

Thursday, 17 July 2014

The Lost Art of Ribbon Work

Project and close up shots of leaves, bud and flower.
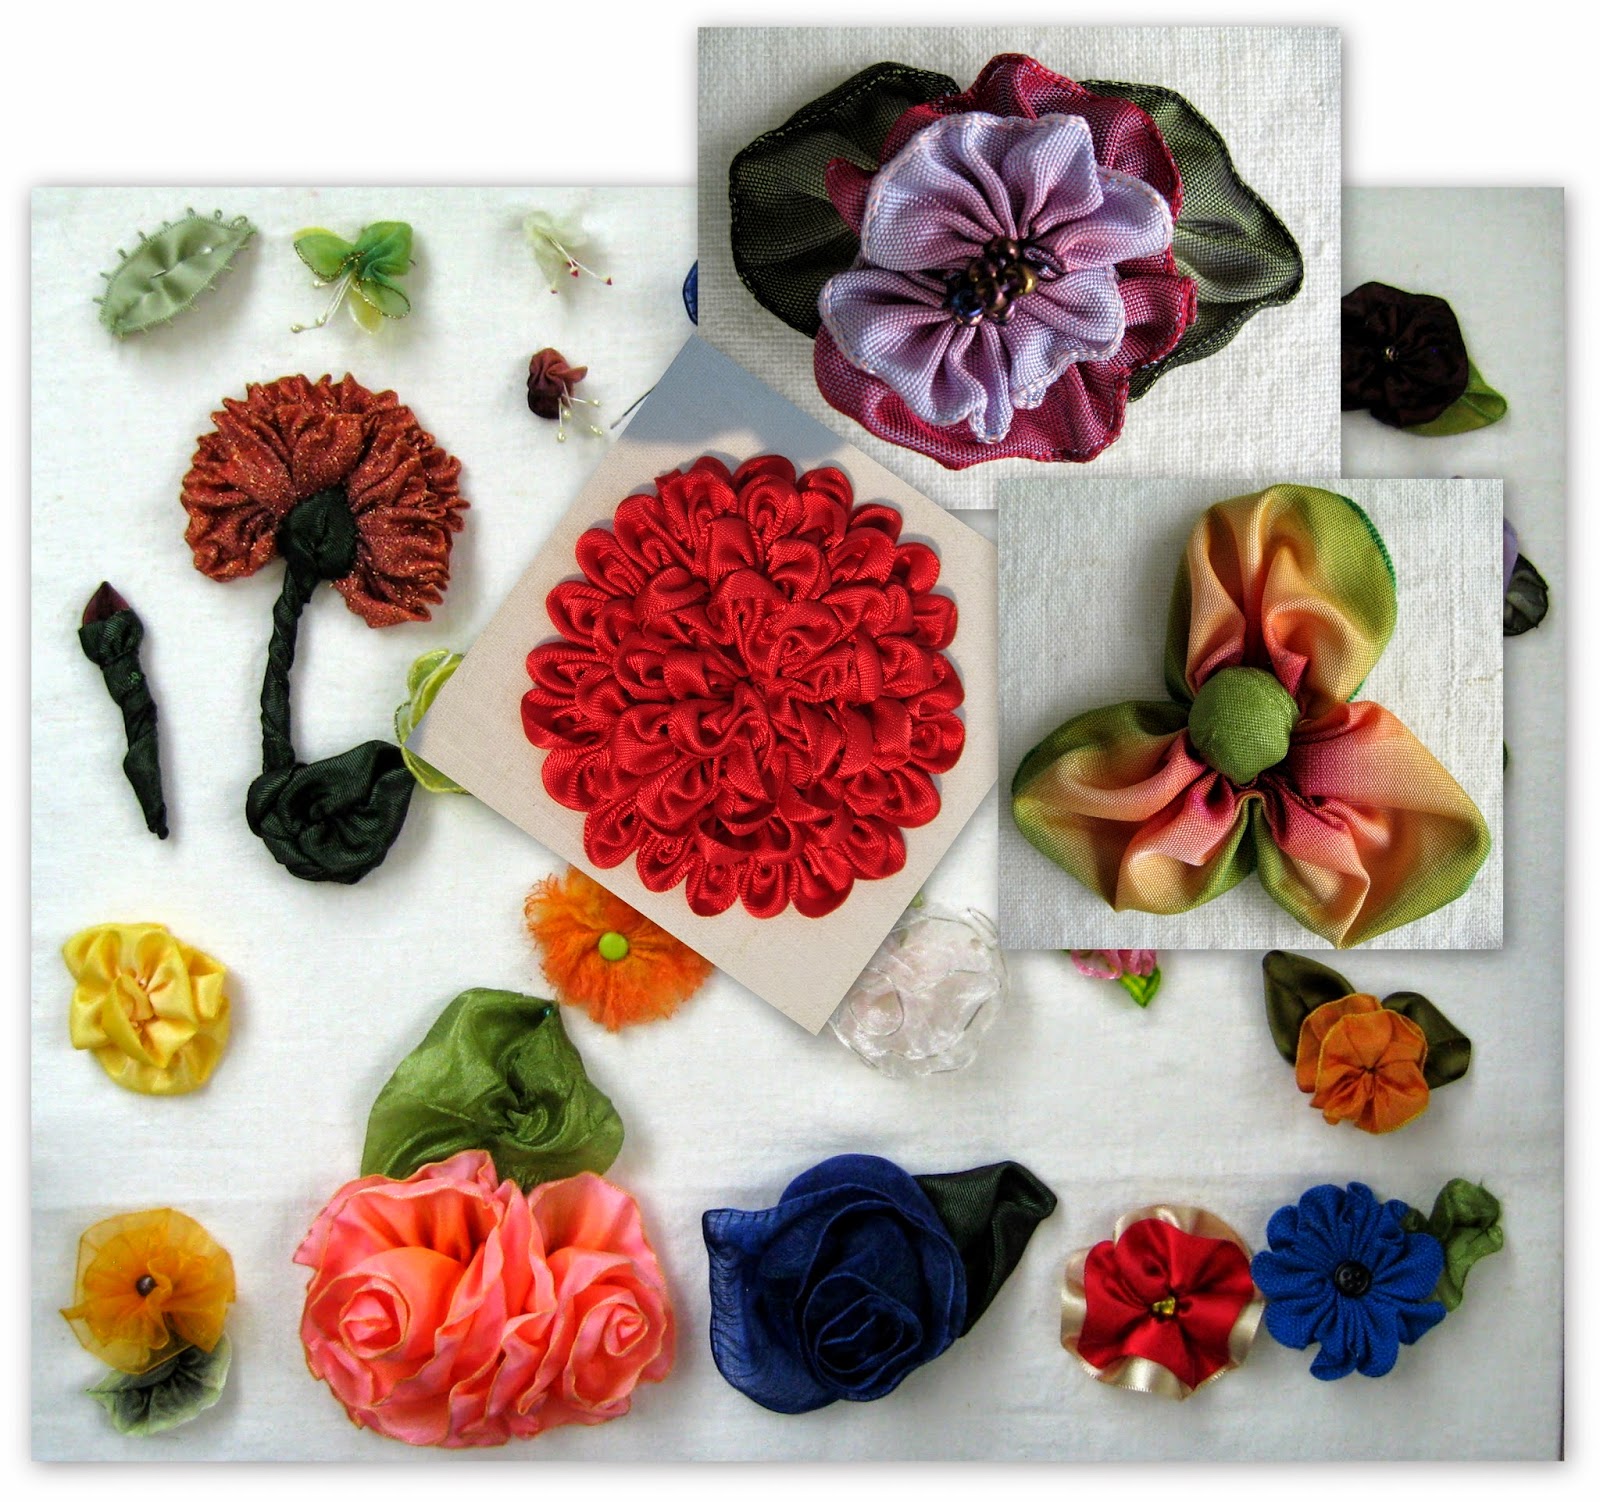
Jan and I just completed the spring session with the Calgary Public Library and presented “The Lost Art of Ribbon Work”. Each participant received a kit, complete with wired ribbon, linen backing and a frame and learned to stitch a simple boat leaf and Jewel Weed flower and put it all together in the frame.

Ribbon flowers have been around for a long time and along with other artistic pursuits, was a skill learned by young women.  In France, one centre of fashion, women could earn a living making these flowers, leaves, rosettes and other ribbon trims sold to design houses and women to embellish hats, gloves, lingerie and headbands.

The 1920’s saw quite a resurgence of the use of these types of decorations.

Republished by Dover Publications in 1986.
Along with this came an interest in The Language of Flowers, where each flower or colour of flower had a particular meaning related to love, death, sorrow or happiness.

We showcased a sample board of other flowers and leaves, which surprisingly are very easy to make, many only requiring a few inches of ribbon and a few stitches to shape and hold them together. The Calgary Public Library has many books in their collection and videos and on line tutorials for making ribbon flowers abound on the internet.

Sample board of ribbon leaves and flowers.
We will be teaching again with the Calgary Public Library this fall, presenting two new projects at 13 libraries throughout the city. 

Registration for these sessions will begin towards the end of August so watch for the new program guide. We hope to see you there.                                                   Jan and Meredith

Monday, 28 April 2014

Final Session "Stitch Your Way Around the World"

Jan and I completed the final “Stitch Your Way Around the World” project for this session of the Calgary Public Library with a return visit to the Ukraine.

Participants could choose from two different Ukrainian cross stitch patterns and learn about aida cloth and counted cross stitch and there was a great amount of concentration as they carefully counted the rows on the cloth in preparation for stitching. Several people commented that they felt very relaxed while they stitched.

Stitch your stress away. Author Unknown
While we were stitching up on the second floor of the Fish Creek Library Branch, the 5th Annual Fibre Arts Fair was being hosted on the main floor with several fibre arts groups giving demos on rug hooking, quilting and other fibre related crafts.


We took the opportunity to have a table with information on the Fibre Optics Group (FOG) available to those who were interested.


Registration is now open for the May-August library programs. We will be doing a framed project at each session of “The Lost Art of Ribbon Work”.

Thursday, 17 April 2014

Stitch Your Way round the World - Japanese Sashiko

Our second to last Stitch Your Way Around the World was a visit to Japan through sashiko stitching. Sashiko literally means “little stab” and is a form of decorative reinforcement stitching (or functional embroidery) from Japan. Traditionally it was used to reinforce points of wear, or to repair worn places or tears with patches.

Today, this running stitch technique is often used for purely decorative purposes in quilting and embroidery. The white cotton thread on the traditional indigo blue cloth gives sashiko its distinctive appearance, though decorative items sometimes use red thread. Contemporarily, many stitchers use Sashiko designs on all colours of cloth and use many colours of thread.

The best dressed library
card in Calgary.
Mostly due to the time element of our sessions we opted to purchase pre printed sashiko fabric and stitched a small pouch to use with a credit card, or in our case, the Calgary Public Library Card.

Preprinted Sashiko fabric.
We purchased the fabric online through Shibori Dragon.  The fabric is meant to be stitched with the printed side as the front and then the lines are washed away, however, we were rebels to the technique and stitched with the printed side up. This was a good decision as it saved a step.


Stitching.
Small box wrap.
Stitching.
Single bottle wrap.
As an aside, I brought along a small
collection of my Furoshiki (wrapping cloths) and showed participants how to tie a large furoshiki into a carry bag and several other wraps. While centuries old in use in Japan, furoshiki are now the new “eco friendly” wrapping alternative.


Stay tuned for our final stop on our Stitch Your Way Around the World journey.

Thursday, 10 April 2014

Stitch Your Way Around The World: West Coast Button Blankets

We continued to Stitch Our Way Around the World, with a stop on the West Coast of North America to take a look at button blankets. Native groups along the west coast from Washington and Oregon, British Columbia and Alaska have made button blankets to wear in a variety of ceremonial events.

The Northern Lights.
Once the Europeans came to North America, natives were able to trade for the materials required to make these button blankets. Red, black or blue fabrics similar to wool felt or melton cloth and two hole mother of pearl buttons are the main supplies required.

It was not easy to find how to make one, but a visit to ShannonThunderbird’s website gave us some great information. The main rules seem to be a rectangle of blue or black bordered on three sides by red with the central clan crest/spirit animal in one of the contrasting colours. 

The crest is often surrounded by the mother of pearl buttons and other abstract or realistic designs are made with buttons on other areas of the blanket.

As our time is limited in our Calgary Public library sessions, we interpreted our own version of the button blanket in the form of a bookmark.

It was interesting to see the variety of ways each person used their buttons and the meaning they gave to their piece.


Most of the participants had not heard of the button blanket and commented that it was fun to learn about a part of our Canadian heritage.

A Spirit Bear
dreams of salmon.


We have two stops left on our stitching journey so stay tuned for those blog posts.


Three interpretations of
Spirit Bear on a journey.

Sunday, 9 March 2014

Stitch Your Way Around the World: Turkish Embroidery

Yesterday was the second in the series of embroidery sessions being offered by Jan and me through the Calgary Public Library where we featured the basics of Turkish embroidery.

Stitching

We had a full house, including our first two men in the many sessions we have taught. In some cultures stitching by men is not unusual and one of our participants yesterday commented that in India boys as well as girls, are taught to sew when they are young.

Couched gold thread
Turkish embroidery is defined by a number of features: gold thread work, couching of threads onto the surface of the work, animal and floral motifs and the recurrence of reds and greens in the colour palette.

Sarma is a type of satin stitch that may be done over a bed of other stitches or over a piece of felt giving the embroidery a raised look.

Gozeme (outlining) stitch
As our time is limited in these sessions we opted to use just the felt and not complete the satin stitch, though some of the stitchers were going to do that at home.

Sarma may be completed with or without the use of the gozeme stitch, which is used for outlining. A common colour for this stitch is a rich dark brown.

Gozeme is a type of running stitch with one thread of the fabric between the stitches not evenly spaced as we are used to seeing a running stitch.

Ready to be frayed

Neatness counts!
The final step was to fuse a piece of iron on interfacing to the back and fray the edges.

Thanks to all of our stitchers and hand models!

Monday, 3 February 2014

Arts Club at the Library

For each of their program sessions the Calgary Public Library has a theme to the programs they offer and the theme for this session was Around the World. So for this session we offered Travel Journals and Stitch Your Way Around the World and we started out February with one session of each.

Arts Club – Travel Journals

The idea of mixed media journaling is to mix decorated backgrounds, hand lettering, photos and ephemera from your trip and of course the actual journaling about your trip. With a limited amount of time we raced through the preamble and the participants had a great time using the items we brought along to colour, stamp and stencil backgrounds into the journal given to each participant from the library.

Each participant brought photos of their trips and other paper ephemera and started right in on a few pages. One gal had been given a bicycle and her journal was a photographic journal of the sights she sees on her adventures along the great bike path system here in Calgary.

If you’re thinking about starting a travel journal as a tourist in another country, a staycation right here at home, or as an armchair traveler from your barcalounger here are a few tips you might find helpful:

  • If you are actually going to start your journal on your trip and do your entries while on your trip, but don’t have any photos to include, decorate your pages before you leave, journal on your pages and use yellow Post It Notes™ as place holders for your photos.
  • If you are going to leave the assemblage of your journal for when you get home and are sending emails home to family members, remember to copy yourself on the emails then you'll have a chronological diary of your trip and you won’t have to write all the journal entries from memory.
  •  Send yourself the journaling entries on postcards from the countries you visit so when you return home you have pictures of places you have visited, postage from that country and journal entries you can use for your journal.

 “A traveler without observation is a bird without wings.” Moslih Eddin Saadi

Stitch Your Way Around the World: Ukrainian Cross Stitch

In the afternoon we joined a group of ladies at another library branch to give an introduction to cross stitch while they made a bookmark based on Ukrainian patterns.

Some were accomplished stitchers but were interested in the ethnic background of the pattern styles and thread colours used in different regions in the Ukraine, while others were new to cross stitching and discovered great tips on starting and ending threads “with NO knots” making for a clean and flat back to the project.

Thanks to Mona S. for sending us a photo of her completed
cross stitch which was used as the background in this photo.

We still have several sessions in March and April and will cover several more embroidery techniques from other cultures as we Stitch Our Way Around the World.

We hope you can join us on our journey.

Jan and Meredith

Saturday, 7 December 2013

Arts Club at the Library

For a terribly cold, though sunny day we were pleased that many of the regular Arts Clubs participants braved the cold to join us at the Central Library for our fibre / mixed media project and the final Arts Club session for 2013.

Each session the Calgary Public Library picks a theme for their programming and the fall 2013 theme was Sight and Sound. We decided on a reusable cotton bag with a music theme, focussing on historic composers and modern day musicians who write their own music.


Participants were introduced to a number of techniques including spray dyes, dye based stamp pads (we should have taken photos of our hands!), embroidery stitches, the making of fabric yo-yos and the printing of photos onto cotton fabrics and organza.  After that they their own creative juices began to flow and new techniques were tried.


A couple of the participants utilized paper towels to create their own masks for spraying and several used their yo-yo circles flat as backgrounds to their photos. If you look closely at Bach he’s looking a little glassy eyed with sequins and Beethoven’s bag is creatively aged with ink for a vintage look.


The one and a half hours went by very quickly. While the projects were not 100% completed I think that it’s safe to say that everyone had a great time and will finish their projects at home.

Jan and I will be back at the Central Library Arts Club on April 5, 2014 so stay tuned for that session.

Tuesday, 4 December 2012

Thornhill Branch

Well, we finished our last Inspired Art Journal session with the Calgary Public Library at the Thornhill Branch.  We had a very energetic group and they were all very creative with their journal pages. It is so inspiring to see people jump in, be creative and want to continue on when they leave.  We have certainly had great support from the library staff for these sessions and we are glad we were able to be a part of the One Book One Calgary event.
Thornhill Branch Journalers
We are happy to announce that we will be leading a Fibre Arts session in the Spring at the Calgary Public Library, Central Branch downtown. We'll post further details as we approach that time.

Monday, 12 November 2012

The Book of Awesome - Inspired Art Journals

We've completed two of the four sessions of Inspired Art Journals at the Calgary Public Library for the One Book, One Calgary programs based on The Book of Awesome by Canadian author Neil Pasricha.

The first was at the newly opened Bowness branch in the NW and the Southwood branch in the SW. Participants were shown a number of mixed media techniques to decorate their journals and discovered that with a few white dots and some black dashes that their own handwriting was quite cool! We also wowed them with heat embossing with embossing powders and our industrial strength heat guns! Fortunately we didn't set off the fire alarms this time!
Bowness Library

Southwood Library


There are still two sessions of Inspired Art Journals remaining. November 15 at Glenmore Square and November 24 at Thornhill. You can register at the Calgary Public Library site.

Each participant is given a wonderful journal courtesy of the Calgary Public Library. For a $12 per year library membership fee these adult programs are a real bargain!

Tuesday, 2 October 2012

Calgary Public Library Sessions

In a previous post I promised that I would update everyone on a fun series of Mixed Media and Art Journaling sessions that Jan and I will be facilitating for the Calgary Public Library in November.

The first Saturday of November we will offer Mixed Media Madness as part of the ongoing Arts Club offered by the library on Saturdays at the Central Library Branch downtown.

During November we are leading workshops on Inspired Art Journals at 4 city libraries based on the One Book, One Calgary event hosted by the library each year. Our Mixed Media and Journaling techniques will be based on The Book of Awesome, the One Book, One Calgary selection for 2012.

Friday, 28 September 2012

Art Journals

After a very fun and successful trip to Portland to see a quilt show and to finally get to visit a Dick Blick Art Shop in person, Jan and I are back and ready to complete planning for several workshops that we will be doing for EcoLiving Events and the Calgary Public Library.

At the EcoLiving Events session at SAIT on Saturday, September 29 we will be doing two sessions on making your own Art Journals using recycled materials. We've been having lots of fun putting them together and coming up with creative uses for items that normally hit the blue bins once they come through the door.


I'll be back to update you on our sessions at the Calgary Public Library, so stay tuned.